STRETCH & REST CARE for the wellness warrior |
|
What do you do when you’re feeling stuck in a rut? It doesn’t matter if it’s fear, overwhelm, confusion, or cognitive fatigue holding you back. There is one MOVE that can help you start moving forward again. Move Your Body. It’s the best bang for your buck when you’re stuck. Why? Physical activity is the number one way to manage stress and complete a stress cycle. It’s also going to bathe your brain in BDNF (Brain Derived Neurotrophic Factor). A protein that is essential for the survival of neurons (cells that make up the brain). It protects the brain from ischemic damage (damage from lack of oxygen), degeneration (deterioration) and promotes long term memory. Just 20 minutes of any kind of physical activity can boost BDNF levels and improve learning, energy levels, memory, MOOD, focus, even your creativity. Stop beating yourself up or trying to figure out why you’re stuck. Start moving and your brain & body will know what to do. Although any form of movement works, one of my favorite moves when I’m feeling stuck is to take a walk. POWER MOVE: Make it Interval Walking. Research shows it IMPROVES:
HOW TO INTERVAL WALK*:
MODIFY TIP: If you’re overcoming a lower body injury and aren’t ready for that much walking, then do the same thing on a stationary cycle until you can transition to walking more. FIT TIP: The more you enjoy it, the better it is for you. Add your favorite music and the dopamine will start flowing (your pleasure hormone). Next time you’re feeling stuck, go for a walk. It’ll help your brain & body get back in flow so you can move forward. Your heart will love it too. Get Moving! Mollie P.S. For more on the benefits of Interval Training and some more workout recommendations, check out this FIT Blog: How To Get Stronger in 1 Minute *From the book: The One Minute Workout by Martin Gibala, Ph.D. **For intensity guidance, refer to the Modified Borg RPE (Rating of Perceived Exertion) Scale from 1 (extremely easy) -10 (extremely hard or max effort).
0 Comments
Let’s do a brain energy checkup. You only have so much brain power each day. In the brain injury rehab world, we talk about energy by thinking of the brain as a pie. Your brain controls everything your body and mind are doing. If 50% of your brain’s focus is on pain (i.e. half the pie), then you’ve only got 50% left for every other function. Pain and stress- whether mental, emotional, or physical- can easily leave you with crumbs energy wise as they take up a lot of brain space (or pie). Here are 3 MOVES to help you free up some brain space for more energy & better performance:
Did you notice all these moves are calming by nature? A calm brain is one that creates, performs & learns better. OK your move. Pick one to test & track how much more energy you have each day for work & play. To Better Brain Moves! Mollie P.S. Want 4 more moves to help trigger your rest & relax mode? Check out this FIT Blog. Have you heard of the Blue Zones? Areas around the world that have a high population of thriving 100 year olds. Ender and I started watching the Netflix series: Live to 100- Secrets of the Blue Zones. Studies are ongoing about their food, exercise, and lifestyles to find any commonalities among these wise souls. Even though it's been 19 years, we both vividly remember an encounter with the most hilarious, sharp witted gentleman in the tiny fishing village of La Sabana, Venezuela where we got married. We ran into him walking on the beach as he did every day. The town elder. Playful and proud of his age. We actually didn't believe it when he told us he was 100. He moved and looked like a 50 year old. I was blown away by his balance on the sand. He had to get another local to back up his story for us to finally believe him. He kept the beach clean and walked all over the town every day checking on and joking with his friends. His diet mostly fish and veggies. He was a character just like the folks you'll see in the Netflix series. In the first episode they brought up one of my top tips for staying active and agile as you age. It's something most people stop doing as they get older. Can you guess what it is? It's a great move and JLO song... Get ON THE FLOOR! Episode one refers to the Sit and Raise Test. It's been researched as a longevity test and tooted as a predictor of how long you will live. 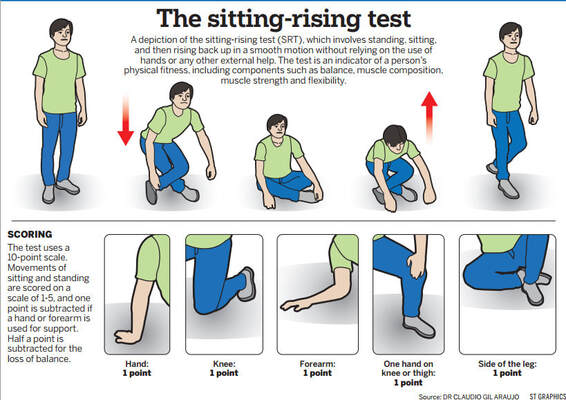 Photo Source Credit: Singapore Times Whether or not this test truly predicts how long you'll live, it's a great test to check in on where the tight and weak spots are in your legs. You can try it if you don't have any major joint issues or just pay attention to where you struggle when you try to get up and down from the floor (even if you have to hold onto something). If you can't even attempt to get down on the floor, well that tells you a lot also. It's OK if you've stopped or avoid getting on the floor. Don't beat yourself up about it. One of the reasons I love yoga and pilates is they encourage us to get on the mat (floor) regularly. Unless you practice a religion that prays on the floor, have a job that involves getting on the floor (i.e. working with kids), or are from a culture that eats meals seated on the floor, you'll have to be more intentional about getting some floor time as you age. You need floor time just like babies need their tummy time! The mobility and strength to get up and down from the floor can help prevent falls as you age. Falls are the leading cause of unintentional injury-related deaths for age 65 or older. If you struggle getting on and off the floor without using your arms, support or losing your balance, then it's time to start working on your hip mobility and strength. We've got you! Here are 2 ways to get started: Over To You: Grab your mat and get some floor time in this week. Cheers to Healthy Aging (& walking on the beach at 100)! Mollie P.S. Ho. Ho. Ho. It’s time to Roll. Our favorite foam roller is on sale until 12/31/23. It’s like having a PT, Chiro, Massage Therapist in one and the closest we can get to sending our hands home with you. You can find it here*. P.P.S. The waitlist for our new REST Camp is open & Week 2 Rest Moves will help you work on your mobility (moving with ease) from head to toe with your new foam roller. GET ON THE LIST *indicates affiliate link Has your sleep routine gotten off track now that Summer is here? Longer days, travel, school breaks make it easy to get out of your sleep routine. How about pillow fights at night? I'm still on a quest to find the perfect pillow for side sleepers. If you’re not waking up feeling refreshed or well-rested, it’s time for a Sleep Check Up. Sleep is when our body & brain restores, heals, and balances the cells. There are 4 stages of sleep, and you need stage 3 or 4 to wake up feeling refreshed or rested. Stage 3 (Delta) recharges your battery and is the primary time for our growth hormone production. Growth hormone helps repair damaged cells and our body makes less as we age. It’s the most natural anti-aging and restorative process for the body. If you’re exercising and eating well but not getting enough sleep or quality sleep, you’re actually aging yourself faster and lowering your immune system. Sleep is the foundation to any workout recovery program. Exercise causes stress on your body. You’re damaging tissue. Your body only gets stronger during the rest time after you’ve stopped working out. Not enough rest equals higher risk for injury. Studies show athletes are more likely to get injured when they are traveling for competitions. The #1 reason is poor sleep due to not being in their own beds. The general rule: MORE STRESS = MORE REST It doesn’t matter if that stress is physical, emotional, or psychological in nature. Stress is stress. The more active you are and the more impact your sport has, the more rest or recovery time you need. This is particularly true if you’re nursing an injury. Sleep is your best medicine. I’ve had to do some tweaking of my sleep routine/prep these past few months due to hormonal changes as it’s really messing with how deep my sleep is. I’ll share some Sleep Moves I’ve been testing to address my issues that are helping but it’s definitely a work in progress as my body is still changing. Let’s start with research supported Sleep Recommendations. 7 HEALTHY SLEEP MOVES
6 PERSONAL SLEEP MOVESHere are some personal Sleep Moves I’ve added to my monthly acupuncture and regular Yoga Nidra naps to improve my quality of sleep (& balance my hormones): 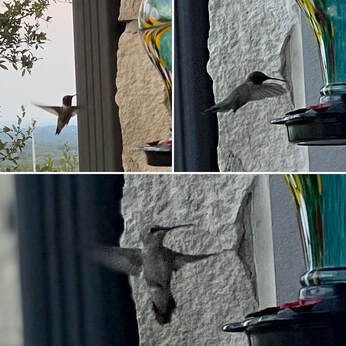 1. Morning Sun- I’ve intentionally worked on making sure I get sunlight first thing in the morning even if it’s just a few minutes to help my circadian rhythm. It’s led to my new obsession – hanging out with our hummingbird friends not just in the morning but when they come by at sunset too. Their movements are fascinating to watch & bring me so much joy as I try to get a good photo which gives me a bonus boost of happy hormones. 2. Screens- I'm avoiding screens an hour before bed or Blue Light glasses if I can’t turn off the damn show or find myself scrolling mindlessly- it happens despite my best efforts. 3. Melatonin PR- Traded in CBD chews for Melatonin 3mg Prolonged Release (Douglas Laboratories) a few hours before bed. My functional medicine doctor added this a few months ago and it’s been a game changer for getting deeper sleep. 4. Magnesium Glycinate- Traded in Natural Calm (Magnesium Citrate) for Magnesium Glycinate (Pure Encapsulations) before bed- another addition from my FM doctor. 5. Cut Down on Caffeine- I’ve cut way down on caffeine as I’m more sensitive to it now and I’ve connected the dots to how much it can mess with my sleep. Bonus from this change is having less afternoon energy slumps! 6. Breathwork- I've added a few Breathing Exercises in Bed to relax my body & calm my nervous system. Part of my sleep prep is still a few massage & stretches with my Rollga foam roller but that’s before I head to bed. I do the breathing exercise once I’m comfortable in bed. OVER TO YOU Hopefully you’ve got some new sleep moves to help you get more of the restorative, deep sleep your brain & body needs each night or to help you get back on track with your healthy sleep habits (especially if you’re traveling a lot this summer). Let me know if you've got a go to tip for better sleep especially if you're dealing with hormone issues as well or have found the perfect pillow! To Deep Healing Rest, Mollie P.S. If you’re a caregiver or in a healing profession, we’ve got a special program coming soon designed specifically for you! Stay tuned… We do not provide medical advice. Always consult a physician prior to starting a new fitness or wellness program. There is one recommendation I share with all my clients. It doesn't matter if they have a strength or mobility issue. It doesn't matter if they have an ortho or a neuro issue. Or whether we are working on improving their pain, posture, or power. What is it? It's a hip check up. Why the hips? Movement begins at the hips. Your hips don’t lie. Imbalances in strength and flexibility of your hips will cause issues all throughout your body because everything’s connected to everything through your fascia (connective tissue). Fascia is the tough connective tissue that spreads throughout your body in a three-dimensional web from head to toe. It holds everything together from your bones and organs to the nerves, blood vessels and muscles. There are over 10 fascial lines running superficial to deep throughout your body that connect specific muscles. Did you know pain in your foot or neck can be coming from a tight hip? Since your hips are at the center of your body, tightness in your hips will pull on the end of the lines. Imagine pressing on the center of a spider web. What happens? The edges get pulled in. The same thing happens in your body. Tight spots in the body put tension somewhere on the fascial line resulting in stiffness and/or pain. If you find and release the tight spots in your fascia instead of focusing on one muscle at a time, you can improve the mobility of the entire line. Better mobility helps prevent injury, re-balance your nervous system, decrease inflammation/pain and improve your posture no matter your age or how many injuries you've had over the years. Start in the center of your body. Find your tender and tight spots in your hips then work your way down the line toward your head and feet to lengthen the fascia to make lasting changes in your posture and flexibility. Here's a hip spot to target first: Your Gluts! Grab a ball and do a hip check up to help release your tender and tight spots using the following massage & stretch moves. HIP MASSAGE MOVES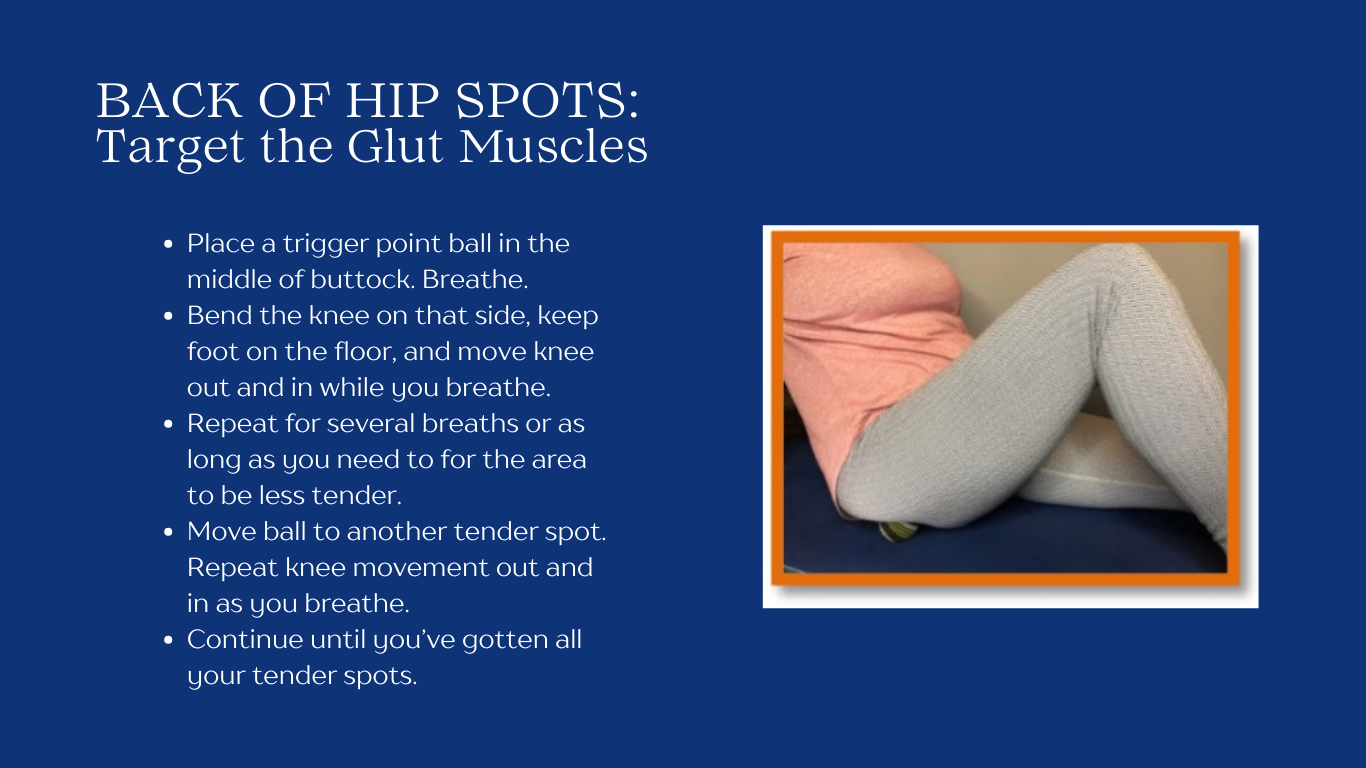 HIP STRETCH MOVES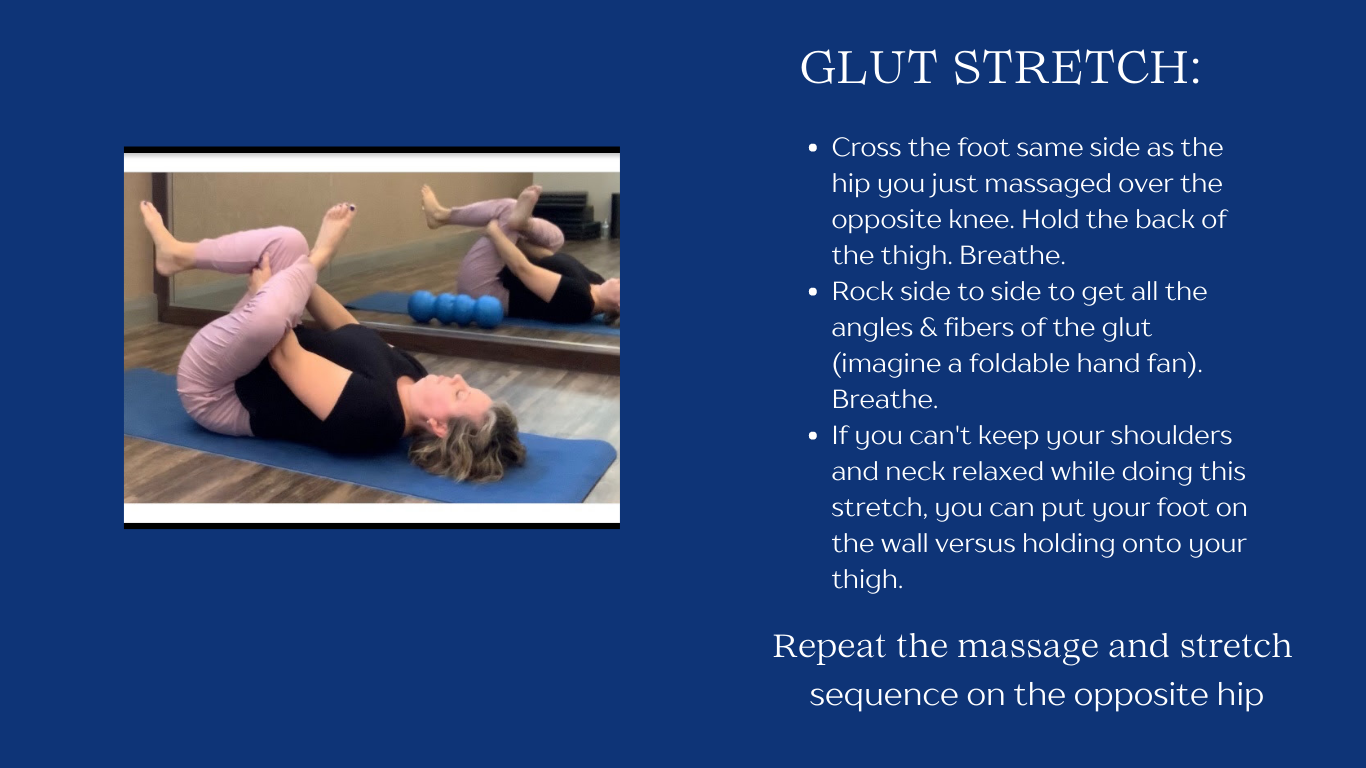 Be gentle. Go slow, breathe, and let the tissue let go without forcing it before you massage or stretch deeper. Let pain be your guide at first as a sign that you need to back off or for how much pressure or stretch to do. If you find some tender or tight spots on one side, give that side more attention. If you don't feel tender or tight, then you've got healthy hips. Go You! It's pretty common to have spots in the gluts when you sit a lot or are very active, especially if you don't have a daily stretch care routine for recovery. Regardless of what you find, here are 3 more stretch moves that will help you open up and have healthy hips.  P.S. Want to get stronger with less effort? Download this 3 minute Active Recovery Yoga Routine to help you train smarter, it's free! Download It Now We do not provide medical advice. You should consult your physician prior to beginning any new exercise program. Here's a Power Move to make lasting changes to your posture and flexibility: Traction while you stretch. It'll help you overcome the compression forces that gravity, aging, sitting and exercise have on your tissue and joints. Ever feel like you are getting shorter as you age? It's not just a posture issue. Gravity is literally weighing you down. Remember everything’s connected to everything from head to toe through your fascia (connective tissue). When you hold onto a stable object to traction while you stretch, it'll help lengthen your fascia from the inside out to make more space in your tissue (i.e. from the joints to end of the fascia line). Here are my favorite ways to traction while you stretch: 1. Hold onto a wall, sink, or rail and stretch your upper body and upper back. 2. Put your foot on a wall, edge of sofa or use a band to stretch your hips and low back. 3. Use Pilates equipment to stretch and lengthen while you move through the movements. This past week, I accidentally found a new powerful way to traction that felt so good. You've got to try it. Here's a 2 minute overview of what happened. GO PROTest out holding onto different objects to see which one gives you the best release and feeling of lengthening through your body while you do your stretch moves. You never know. It might just be a tree like me! In the future, your goal will be to learn to traction & stretch without holding onto or bracing on something. Pilates or Bands are great ways to help you transition off holding onto or bracing on something to traction while you stretch. Go hang out! Mollie P.S. Want to learn how to traction while you stretch using the wall and bands? Join us in HIP Camp™. Camps For A Cause: For every camp sale we donate to organizations that support the health & welfare of animals, wildlife, & marine life. Two of our favs that help rescue & rehab are Beagle Freedom Project & Sheldrick Wildlife Trust. It’s time… to give yourself the gift of rest. I know how foreign rest is to so many of us especially women, caregivers, and health professionals. We've got a 3 Day Rest Adventure to share with you - it's free so no excuses! It’s only been 3 years since I started my own rest adventure using the rest tool of Yoga Nidra. I found it when I was completely worn out from helping my dad through his 3rd cancer surgery in a year while he lived 6 hours away from me. A podcast during my last commute before I moved him back to my area caught my attention and that led me on a 40 day Yoga Nidra challenge. One nidra nap and I was hooked. I'll never forget the way it refreshed and energized my worn-out body (and soul). I've stuck with it almost daily since then and when I find something that is this powerful for my mind and body I always want to share it with everyone which leads me to taking another certification (i.e. Pilates, Fascial Stretching, Trigger Point Therapy). Ironically, I found myself doing my Yoga Nidra Daring To Rest™ facilitator training during the first few months of the pandemic. I was rapidly approaching burnout due to having to coordinate care of my complex neuro patients (and my dad) in an upside down medical system while we all were dealing with the stressors of living through a global pandemic. Having Yoga Nidra in my rest toolbox kept me from crashing into my typical burnout cycle. I saw the signs and added as much nidra rest when I needed it as best I could to get me through it. What I love about Yoga Nidra is that it addresses 3 layers of exhaustion- physical, mental/emotional, and soul exhaustion. Most rest tools address physical or only one area but the deep rest of Yoga Nidra using the Daring To Rest™ method addresses all three. The best part is you don’t have to do anything except lie down and listen to a recorded meditation. You’ll get the rest medicine you need at the time. For me, the pandemic brought on intense mental/emotional exhaustion I had only felt on that level a few times in my life- after a divorce and the death of my mom. Lots of brain fog. I couldn’t even focus on reading books which I love to do. I definitely didn’t have any creative juices flowing until about the middle of 2021. As much as I’ve wanted to share what I’d learned in my training with our community, I had to listen to my body. The message until recently was "not yet Mollie, just rest." Honestly before I knew about this rest tool, I wouldn’t have listened. I would have pushed through to get it out there as I know how much it helps and is needed. Even though the message I’m getting now is “let’s go” and the brain fog has lifted, the plan is to ease our way into sharing this new rest tool with you. I’m inviting you on a 3 Day Yoga Nidra Rest Adventure. It’s free and only takes 15 minutes each day. All you have to do is lie down and listen to a recorded Yoga Nidra meditation at a time that works best for you. You’ll want to commit to the 3 days in a row to get the most benefit. JOIN US ON A 3 DAY REST ADVENTURE  PREP WORK: MAKE SPACE FOR REST Your homework is to tune into your body and figure out what time of day you want to block off to rest for 15 minutes for your 3 day adventure. This will help you actually do it. It can be in the morning, midday when you have low energy, at the end of your workday before you transition to your evening home activities, or just before bed to help with sleep. The time doesn’t really matter. What matters is you commit to 15 minutes of rest for the 3 days by picking a time and blocking it off on your calendar as soon as possible. You can then schedule other activities around it. Trust that your mind and body will get what it needs no matter the time you pick. It’s OK if you aren’t normally a napper. This is deep rest and relaxation for your nervous system. You might just have the most nourishing nap you've ever had. Be open to testing it out. You have to feel it in your body to truly understand the benefits. It’s also OK if you're resisting because you’re telling yourself that you’re too busy. It’s normal for there to be resistance when trying something new and rest is not something that is encouraged by our society. Let the resistance pop up, notice it, but do it anyway. You deserve to rest no matter what your brain is telling you. SIGN UP NOW FOR 3 DAYS OF REST Say Yes To Rest! Mollie P.S. If you’re worn out, burned out or just in need of a time out, the free 3 Day Rest Adventure is for you. All you have to do is lie down and listen for 15 minutes. And we’ll give you 2 simple prep steps to help you actually slow down enough to do it. We’ve got you so… COME REST WITH US! Do you feel pain when you stretch? If so, it’s a sign you’ve gone too far. Remember healthy tissue isn’t stiff. It’s elastic. Bungee cord like versus rope like. You can bring the spring back to your body with stretching no matter your age but there is an art to stretching. Just like we've evolved from flip phones to smart phones, we've made advances in stretching that can help you have better results. First you have to learn to stop over-stretching. If you experience pain with stretching, your body will tighten up more. Why? The body’s response to pain is to protect, tighten up, guard. Gentle stretching is key to stop over-stretching. Stop stretching as far as you can go. Start stretching at about 90% of your pain-free range of motion. The goal is to calm the body so the tissue will lengthen and let go. Here are some basic stretch principles to practice that'll help improve your elasticity: BE GENTLE Don’t force the motion or your body will tighten up. Check in with your face and neck. Are you tensing up because the movement is uncomfortable? That’s a sign you’re stretching too far. BREATHE Always breathe while stretching to help hydrate the tissue and increase the circulation to the area. Slow, deep breaths are calming. FOCUS Be mindful while stretching and focus on what you are feeling in your body as you stretch. Imagine restoring the spring in the tissue vs. pushing to your limits to get taller or more flexible. Stretching the fascia can feel like a burning sensation, but it should go away as soon as you stop stretching. Feel for the tissue to let go, releasing before you stretch farther into the movement. CHANGE THE TEMPO Stretching with proper breathing prepares your nervous system for your next activity. Fast, shallow breaths will turn on your nervous system. Slow, deep breaths will calm your nervous system. Breathe and stretch faster before exercise. Breathe and stretch slower after exercise for recovery. CHECK YOUR FORM Stretch with good form and control. Hold positions for 2-3 breaths before your workouts and a little longer after workouts. MOVE MORE Take mini movement breaks throughout the day to help your fascia be healthy and elastic. It all adds up whether it’s 3 breaths, 3 reps, or 3 minutes of movement. Become more mindful of these principles as you stretch each day to help you feel and move better. Let pain be your guide at first as a sign that you need to back off. Go slow, breathe, and let the tissue let go before you stretch deeper. If you want to make lasting changes in your flexibility and posture, you’ll want to learn how to use fascia stretching and trigger point massage tools. We show you how in our online Rest Camps. Camp routines are designed to help you release your most glued down stuck spots (whether they’re from chronic injuries or intense workouts) in less than 10 minutes a day so you can move & perform pain-free. Get on the interest list here. Let’s get you stretching with (lasting) benefits!  P.S. Maximize your stretch results with this flexibility hack: The One Thing To Do Before You Stretch. I'm sure you've heard about how to exercise your core muscles in your trunk area but did you know you’ve got a foot core too? We’ve got 4 layers of muscles in feet- i.e. the intrinsic muscles. 4 layers!!! Doesn’t seem like there is enough room, does it? Most of the time you only hear about the plantar fascia (connective tissue) as it gets all the attention when it’s flared up, i.e. plantar fasciitis. They may not be as vocal when you’ve got a foot injury, but the foot intrinsic muscles are important too. They make up your foot core and help provide stability of the arch and control toe movements. They play a huge role in functional movements and by helping with your balance and posture. It's very easy for them to be weak or even turned off due to tight spots in your calf and foot fascia. They LOVE to be lazy when you’re wearing cushy shoes (all that cushion in our shoes helps with impact on our joints but encourages our foot core to not work very hard). So how about we give them some love in honor of Valentine’s day? 1. DO A FOOT CORE CHECKUP. You probably know if you have a high arch, low arch or no arch but let’s see how your foot core muscles are doing. This might be easiest to do in front of a mirror where you can see your foot vs trying to look down at your foot. Or you could video and look at it after you do the moves. Stand on one leg. Hold onto a counter, wall or chair if needed to but with as little support as possible. Don’t lock out your knee- keep a soft knee. What do you see going on in the foot your standing on? Is there any flickering going on in the top of your foot tendons or any movement side to side from trying to keep from falling over? Or is your foot like a flat pancake on the floor with no arch? Or maybe it’s like a dead fish- limp, no life? Are your toes holding on for dear life to the floor, so you don’t fall over? How does it feel? Does it hurt to stand on one foot? Are you wondering where the floor is? Is it hard to balance? Are your hips working hard moving side to side to keep you upright? No judgment just look and feel what’s going on or not going on. What happens if you bend your knee slightly? Any changes? Now check out the other foot. Go through same questions and then compare to other foot. Flat arches, no signs of muscle activity on top of your foot, difficulty balancing and/or your toes flexed and trying to grip on the floor are signs your foot core muscles need some attention. One foot core may be having more issues than the other one. It'll depend on which hand you are dominant and what kind of activities you do each day. Also if you've had any injuries on one side. It doesn't matter, both sides probably need attention. 2. GIVE YOUR FOOT CORE SOME LOVE. Massage your foot core: Self-Massage on the bottom of your feet with your hands or massage tools will help release trigger points (tender spots). Keep it simple and use a tennis ball, racket ball or even dog toy if you don’t want to buy a massage tool. Roll back and forth from the ball of your foot to the heel or find tender spots to hold pressure on for a few breaths then move to another tender spot. You can do foot massage in sitting or standing. Sitting is less intense than standing. Massage the bottom of your foot as described to get to the foot core muscles. You can gently massage the top of your foot with your hands but the top (dorsum) of your foot is more sensitive and more bony. If your foot is flared up, you can do ice massage by rolling back and forth on the bottom of your with a frozen water bottle for several minutes. An added bonus to massaging your feet is that the bottom of your foot has acupressure spots for every organ in your body. When you massage your foot, you’re sending calming signals to your whole body. Stretch your foot core: Stretching the tight spots in your toes, ankles, and calves in sitting or standing can help your foot core turn on.
Strengthen your foot core: Full body and barefoot workouts like Yoga or Pilates will help strengthen your foot core.
Challenge your foot core: Pilates Reformer work, unstable surfaces (like Bosu ball or foam surfaces) and doing band work resistance exercises barefoot are some of my favorite ways to challenge the foot core. Support your foot core: Good arch support will help keep your foot in good alignment which helps your foot core turn on properly. You might need some extra arch support if you have very flat feet or high arches, stand a lot each day, or do an impact sport like running. It could be a simple over the counter foam insert to a custom orthotic. Typically, the liner that comes in your shoe is crap. You’re not looking for a huge build up under the arch. Just a little arch support so it’s not completely collapsed, and you aren’t getting pain in your feet or knees with activities. You can learn from a health professional how to use kinesiotape to calm down foot pain if you get flare ups and support your arch but it’s important to also strengthen your foot core to help avoid foot injuries. 3. DO A RECHECK. If you try any of the above foot care tips, recheck to see how your foot core is doing. Stand again on one leg and see what’s going on down there. Do you see more activity on the top of your foot, have better balance and/or a little bit of arch activity where there is some space between your foot and the floor? How does it feel? Hopefully you’ll feel more contact with the floor and more grounded or stable overall. Even though your feet are at the end of the line, they’re the first body part in contact with the ground which then causes a chain reaction up the leg and into your trunk muscles. They need just as much love as the rest of your body. Just a few mini moves for the foot core make a big difference in your posture and balance. Give your foot core some love each day! Mollie P.S. Want more tips on how to check your form? Here's a Fit Blog that'll help. Want more massage tools & stretch routines to support and challenge your foot core (and hip core) We’ll show you how in HIP Camp™. How are your feet doing? If they aren't feeling healthy & happy, it’s always good to check in on any shoes that you use regularly or that have foam soles. Whether you wear them or not, the foam in your shoes gets more dense and compresses over time. Don’t wait until your feet hurt to do a shoe checkup. Have they lived their best life? Are the soles worn out? Is the fabric stretched out? Are your feet hurting at the end of the day or after workouts? Do your knees or back hurt more lately? If so, they're all signs it might be time to get a new pair. Before you pick out a pair because of the color or cuteness, here are some shoe shopping tips to consider that’ll help prevent injury and give your foot muscles the love they deserve. COMFORT: What’s your first impression after putting on the shoes? Don’t play mind games with yourself by telling yourself that you need to wear them in for that seam cutting into your pinky toe to go away. It doesn’t matter how cute they are, if anything feels uncomfortable or off when you first put them on... you need to move on. If they pass the first impression test, move around in them to double check your foot and heel stay in place. Stand on one leg. Jump. Walk or run a few steps. Turn and stop quickly. Still feel good without any slipping or sliding going on? You may have a keeper. SUPPORT: You're aiming for just enough support for your arch and the activity you will be doing. The more impact your activity, the more cushion you will likely need from your shoe. Caution: Be careful with the barefoot or minimal arch shoe styles, especially if you run. I love to workout barefoot to help turn on all my foot muscles but it’s super easy to injure yourself if you run or lift weights with shoes that have minimal arch support. I’ve done it a few times and it can take months to heal foot injuries. If you have a pair, you must wean into them and they aren’t meant to be worn all day. Change it up and/or take a break if you feel your foot muscles getting tired or cramping when using a minimal arch support style shoe. TRACTION: Make sure you’ve got the right tread on the bottom for what you’ll be doing. Rocky terrain requires a different level of traction than smooth pavement. GREEN BRANDS: If you’re committed to a green lifestyle, take the time to investigate where your shoe parts and packaging come from and whether the shipping does or does not support the planet. Here are two companies to consider:
- Upper in Alveomesh (100% recycled plastic bottles). Alveomesh is a technical fabric made exclusively from recycled plastic bottles. It brings breathability, flexibility and lightness to the shoe. - Pannels in suede & leather - Side V Logo in Rubber and Rice Waste (23%) - Organic cotton laces (100%) - Midsole made from sugar cane (53%) - Glued outsole made of Amazon rubber (12%) & rice waste (30%) - Sugarcane insole, Amazon rubber, recycled E.V.A. & organic cotton - Tech inner lining (100% recycled plastic bottles) developed to acquire a better resistance to friction and provide maximum comfort and flexibility thanks to its mesh structure. It’s actually fun to see how creative these companies are getting with recycling and athletic gear. The Veja shoe listed above is super cute too. OK, time to go check your shoes and get to shopping. To Happy, Healthy Feet! Mollie P.S. Ready to have a calm, strong, well-rested body? Our online bodywork camps will not only help you Move With Ease but every camp sale supports an organization that improves the health & welfare of animals and wild life like the Beagle Freedom Project & Sheldrick Wildlife Trust.
|
Mollie, Ender, Ty & Teddie
Mollie Miller, PT
|
 RSS Feed