STRETCH & REST CARE for the wellness warrior |
|
Has this snuck up on you too? Those trips to the bathroom at night? It's common as we age but there really isn't any research to show it's normal. You may not realize how disruptive to deep sleep every bathroom trip is. I didn't until recently. I've been working on improving my sleep quality for over a year but hadn't really addressed my bladder. I'd connected the dots on drinking fluids late at night with more frequent trips but not much beyond that. It helps me for sure to limit fluids a few hours before bed and just take sips of water if I need it during the night. And last year I'd cut back on caffeine as I became more sensitive to it disrupting my sleep. But there is much more you can do to improve your bladder health and ultimately decrease those trips to the bathroom. Let's start with 6 Bladder irritants you may not be aware of:
Not everyone is sensitive to these but it's worth checking out to help your brain know it doesn't have to send a signal to your bladder to empty at night. Uncovering your sensitivities can also help if you have frequent UTI's (Urinary Tract Infections) or leaking when you sneeze, cough, laugh, or during activity. It might take some detective work and monitoring your bathroom trips to figure out if you're sensitive to any of them. If you do uncover sensitivities, start to reduce how often you consume them especially later in the day. For some, you may have to eliminate them all together. Next up, I'll share what has eliminated my trips to the bathroom most nights AND helped me stop needing Melatonin the first week I started doing it. To Better Sleep! Mollie P.S. Ready for more Energy & Flow? It's almost time for our FREE Summer Workshop & the inside scoop on our next REST Camp: SHINE™! Get on the interest list here.
0 Comments
Our 13 year old dog, Teddie, got a home exercise program to strengthen his back and hips at his last vet appointment and that, of course, made me think of 2 FIT TIPS to help YOU get stronger. We’d noticed he was having more stiffness and difficulty getting up from the floor or jumping up onto surfaces. Apparently, it’s common for dogs to start to overuse their stronger front legs as they age and start to develop arthritis/pain in their spine or hips. We went deeper into why that is to satisfy my PT brain, but I won’t bore you with that. More importantly, the discussion reminded me of 2 Healthy Aging Moves to share with you. But first, check out Teddie being a good boy doing his homework: 3 sit to stands every day to strengthen his back and hips/legs. Yes, snacks are included!  Here's Your Homework (without the snacks):1. ADDRESS YOUR WEAK SPOTSTeddie’s vet visit was a great example of how our brain loves to find the easiest way to move so you’ll automatically default to overusing your stronger muscles even if that isn’t an efficient movement pattern. We all have muscle imbalances in our body based on which hand is dominant, what you do all day, or the sport you play. Full body workouts like Yoga and Pilates are a great way to work on strengthening both sides of your body. Tightness or stiffness can also be a sign you’ve got some underlying weakness in your postural and core muscles. If you’re weak, your body will tighten up in key spots to hold you up against gravity. Finding your tight and weak spots will help balance you out. 2. FOCUS ON YOUR LEGSTeddie’s vet visit was also a great reminder of how important it is to keep your legs strong as you age. Have you ever noticed that some folks have difficulty standing up from chairs/sofas as they get older? It’s related to a variety of things- hip weakness, stiffness in their joints, and/or a fear of falling that can develop due to decreased vision, balance, and flexibility. The fear leads to them not leaning their trunk forward enough to stand up and it just spirals from there. And guess what they start to do- overuse their arms to stand up! Just like Teddie… Left unchecked it'll increase their fall risk. Falls are the leading cause of unintentional injury-related deaths for age 65 or older. Having a solid strength training program for your legs is a key component to staying active & agile as you age. Unlike dogs, we can't walk on our hands! Focus on your hip mobility & strength and use these exercises to help you get started. DAILY MOVES: Take Sit to Stand breaks throughout the day. It’ll help counteract all the negative effects sitting has on your posture and joints but also help your heart stay healthy. There is research showing that standing up once every 20 minutes is more effective than walking 15 minutes on a treadmill for cardiovascular and metabolic changes. It’s also more beneficial than standing up 35 times at once. You’ll want to stand up every 20 minutes to overcome the negative effects of sitting. Teddie has to do 3 sit to stands per day but you need to do 3 per hour of sitting.
POWER MOVES: Add these Power Moves to workout routines for stronger legs, hips, and core muscles. OVER TO YOU: Which moves will you start with this week? FYI if you need snacks to get you motivated at first like Teddie, aim for protein snacks (it's OK to sneak in a little dark chocolate too). To Strong Legs! Mollie P.S. Want more help with your tight & weak spots? Our next round of SHINE™ & opportunity to be a part of Rest Crew #2 is coming up soon- get on the waitlist here. You know how much I love simple yet powerful moves to help our brain & body perform better. Here are 2 moves to help you reset & have more energy in less than 2 minutes: 1. Brain Reset: Use this breathing exercise (a "physiological sigh") to reduce stress in the moment.
2. Body Reset: Follow the Head To Toe Posture Checklist to turn on your core stabilizers & reset your posture during the day, to prep for workouts, or after sitting long periods. These tiny muscles need reminders and better posture helps light up your brain. This FIT Blog shows you a simple routine to find them. Both of these moves are most powerful when you do them for a few reps each day. Reps help your brain rewire for healthier thoughts & better movement patterns over time. Stress & poor posture won't be as draining on your energy levels. Set an alarm to remind you to practice throughout the day when you're first getting started. Enjoy the energy boost! Mollie P.S. The Waitlist for our NEW Rest Camp: SHINE™ is OPEN. There is one recommendation I share with all my clients. It doesn't matter if they have a strength or mobility issue. It doesn't matter if they have an ortho or a neuro issue. Or whether we are working on improving their pain, posture, or power. What is it? It's a hip check up. Why the hips? Movement begins at the hips. Your hips don’t lie. Imbalances in strength and flexibility of your hips will cause issues all throughout your body because everything’s connected to everything through your fascia (connective tissue). Fascia is the tough connective tissue that spreads throughout your body in a three-dimensional web from head to toe. It holds everything together from your bones and organs to the nerves, blood vessels and muscles. There are over 10 fascial lines running superficial to deep throughout your body that connect specific muscles. Did you know pain in your foot or neck can be coming from a tight hip? Since your hips are at the center of your body, tightness in your hips will pull on the end of the lines. Imagine pressing on the center of a spider web. What happens? The edges get pulled in. The same thing happens in your body. Tight spots in the body put tension somewhere on the fascial line resulting in stiffness and/or pain. If you find and release the tight spots in your fascia instead of focusing on one muscle at a time, you can improve the mobility of the entire line. Better mobility helps prevent injury, re-balance your nervous system, decrease inflammation/pain and improve your posture no matter your age or how many injuries you've had over the years. Start in the center of your body. Find your tender and tight spots in your hips then work your way down the line toward your head and feet to lengthen the fascia to make lasting changes in your posture and flexibility. Here's a hip spot to target first: Your Gluts! Grab a ball and do a hip check up to help release your tender and tight spots using the following massage & stretch moves. HIP MASSAGE MOVES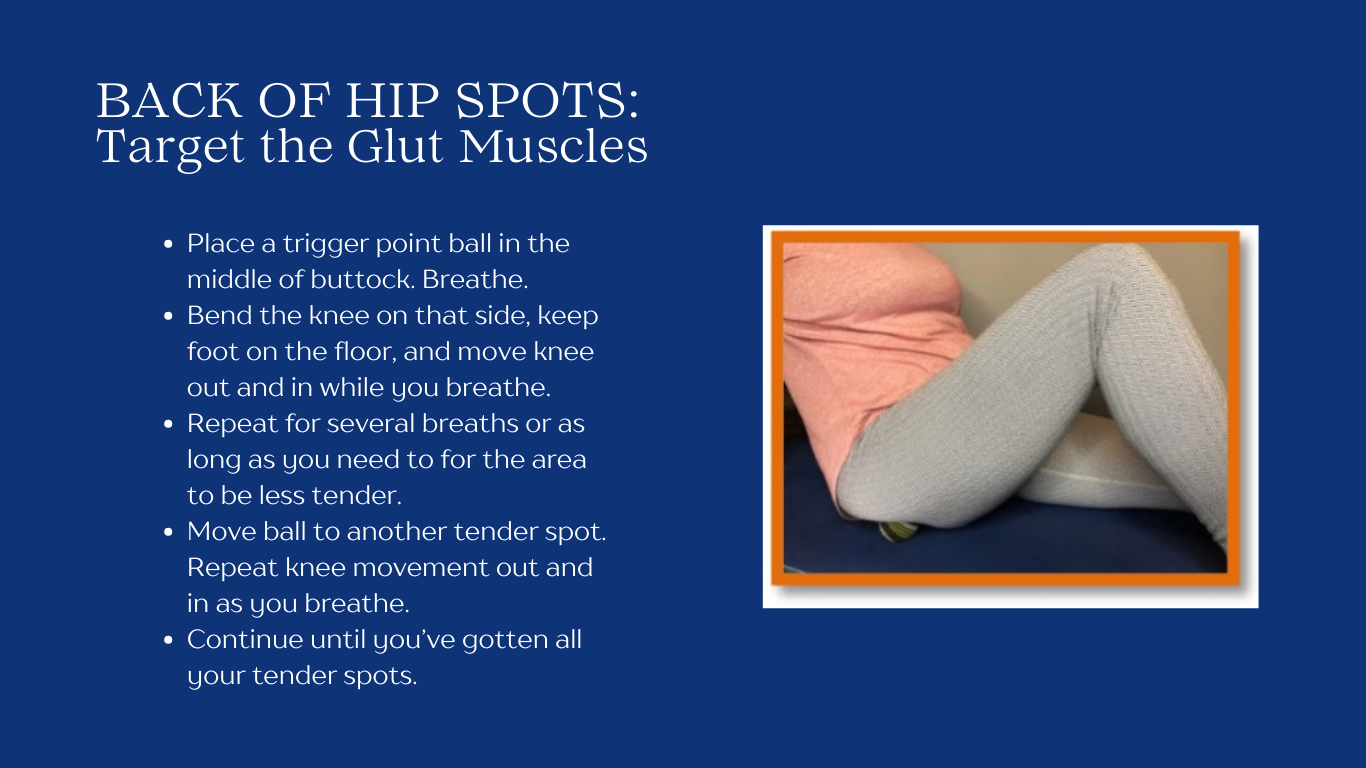 HIP STRETCH MOVES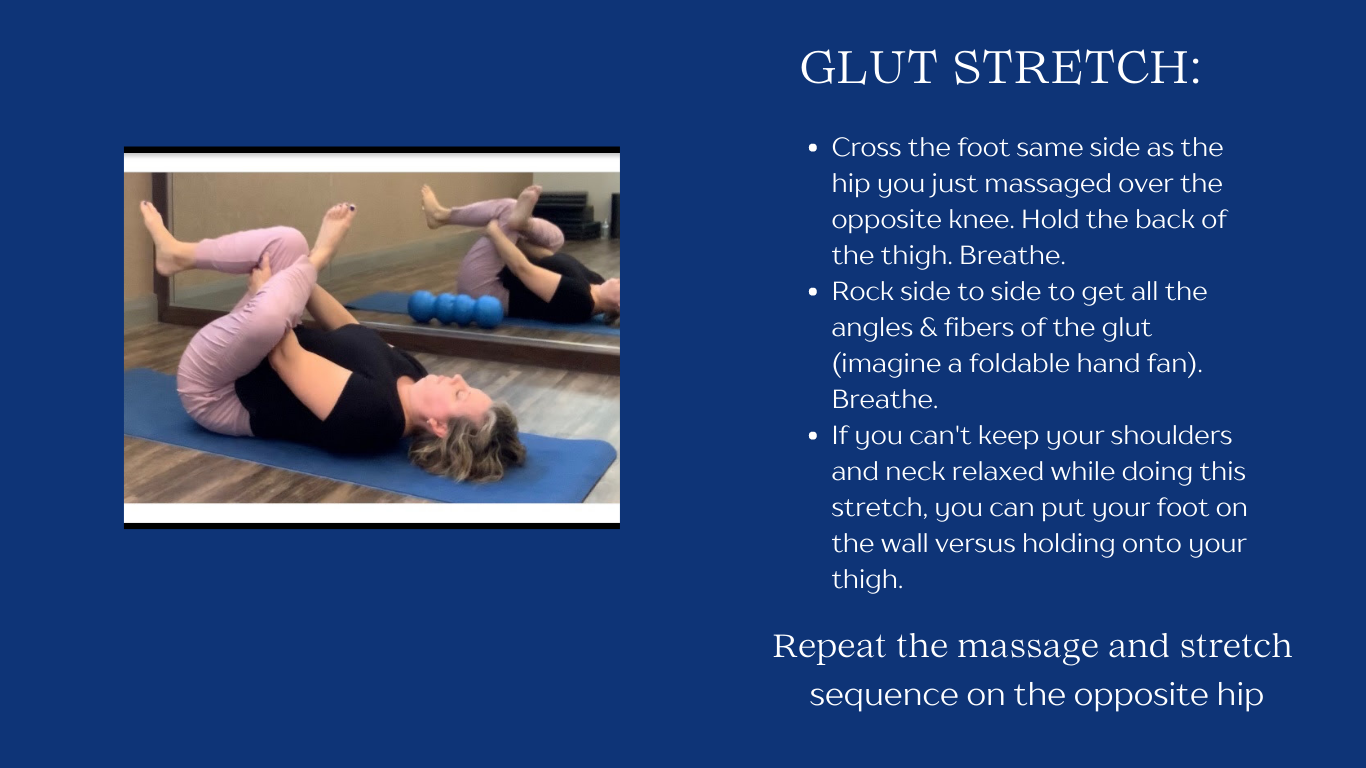 Be gentle. Go slow, breathe, and let the tissue let go without forcing it before you massage or stretch deeper. Let pain be your guide at first as a sign that you need to back off or for how much pressure or stretch to do. If you find some tender or tight spots on one side, give that side more attention. If you don't feel tender or tight, then you've got healthy hips. Go You! It's pretty common to have spots in the gluts when you sit a lot or are very active, especially if you don't have a daily stretch care routine for recovery. Regardless of what you find, here are 3 more stretch moves that will help you open up and have healthy hips.  P.S. Want to get stronger with less effort? Download this 3 minute Active Recovery Yoga Routine to help you train smarter, it's free! Download It Now We do not provide medical advice. You should consult your physician prior to beginning any new exercise program. Happy Holidays! Before you wrap this year up, make sure you go all out & C-E-L-E-B-R-A-T-E. Have some fun & play time with friends & family, but also take time to celebrate your personal wins. Remember when you connect celebrating yourself with new habits, it increases the chances you'll build new behaviors and and create lasting transformation. It's also a great way to prep for ringing in the new year. Here are 3 simple ways to prep for 2023:
Go celebrate! Mollie & Ender P.S. If having more energy, ease & flow are part of your 2023 wellness priorities, here are some workout & burnout rest tools to help you get started: REST TOOLS: Ho. Ho. Ho. It’s time to Roll. Our favorite foam roller is on sale until 12/31/22. It’s like having a PT, Chiro, Massage Therapist in one and the closest we can get to sending our hands home with you. You can find it here*. Stock up on bands to build a strong core: Core Bands* Super Bands* REST CAMPS: Grab your tools then let us show you our favorite massage & stretch moves with them in one of our online camps.
CAMPS WITH A CAUSE: For every camp sale, we’ll make a 15% donation to the Senior Dog Rescue Program at Beagle Freedom Project to help with their medical care. REST YOUR GUT: Get started on your Clean Eating Adventure with The Nutrition Starter Set. It'll help give your gut a bit of a rest break for 30 days by decreasing the toxic load from inflammatory foods and allergens. You'll learn a simple, safe way to detox for better energy, less inflammation, and/or to release some weight. 3 DAY REST ADVENTURE: If you're worn out, burned out, or just in need of a time out, our free 3 Day Rest Adventure is for you. Say Yes To Rest *denotes affiliate link FYI Beagle Freedom Project is a fav organization of ours that rescues and rehomes animals who have been used for lab testing in the United States and abroad. In addition, they also work tirelessly to champion laws and legislation to ban the cruel practice of animal testing nationwide. Here's a Power Move to make lasting changes to your posture and flexibility: Traction while you stretch. It'll help you overcome the compression forces that gravity, aging, sitting and exercise have on your tissue and joints. Ever feel like you are getting shorter as you age? It's not just a posture issue. Gravity is literally weighing you down. Remember everything’s connected to everything from head to toe through your fascia (connective tissue). When you hold onto a stable object to traction while you stretch, it'll help lengthen your fascia from the inside out to make more space in your tissue (i.e. from the joints to end of the fascia line). Here are my favorite ways to traction while you stretch: 1. Hold onto a wall, sink, or rail and stretch your upper body and upper back. 2. Put your foot on a wall, edge of sofa or use a band to stretch your hips and low back. 3. Use Pilates equipment to stretch and lengthen while you move through the movements. This past week, I accidentally found a new powerful way to traction that felt so good. You've got to try it. Here's a 2 minute overview of what happened. GO PROTest out holding onto different objects to see which one gives you the best release and feeling of lengthening through your body while you do your stretch moves. You never know. It might just be a tree like me! In the future, your goal will be to learn to traction & stretch without holding onto or bracing on something. Pilates or Bands are great ways to help you transition off holding onto or bracing on something to traction while you stretch. Go hang out! Mollie P.S. Want to learn how to traction while you stretch using the wall and bands? Join us in HIP Camp™. Camps For A Cause: For every camp sale we donate to organizations that support the health & welfare of animals, wildlife, & marine life. Two of our favs that help rescue & rehab are Beagle Freedom Project & Sheldrick Wildlife Trust. Did you Make Space last month to slow down for rest? If decluttering didn’t help turn on your rest & relax mode, you can try a different strategy: Move Your Body. Movement can help prepare your brain & body for rest. It’s the cue that it’s safe to calm down. Think about a yoga class. Most start with movement poses and end with relaxation poses or meditation. Moving your body first can help it calm & slow down. What kind of movement? It depends. Every BODY is different. You have to experiment and play with different moves to see which ones help you turn on your rest & relax mode. Tune into your body. What kind of movement does it need to slow down? It might need to shake, shout, sing, or stretch it out for just a few minutes before you rest. Or it might need to complete a stress cycle with 20-60 minutes of physical activity. Moving your body is the best way to complete a stress cycle and signal to the brain the threat (real or not) is over and it’s OK to calm down. Find something your body loves moving and doing before resting- running, jogging, walking, dancing, cycling, swimming, rowing, Yoga, Pilates, paddling, rock climbing- anything that feels good & triggers your rest & relax mode. Listen to your body. It’ll tell you what moves it needs to slow down. It’ll not only feel calmer but also help you tap into more of your intuitive, creative, and happiness vibes. Move & Play before you Rest & see how your body responds. Have fun! Mollie P.S. Want 4 more moves to help trigger your rest & relax mode? Check out this FIT Blog. I’ve known what I wanted to share with you this month, but it’s been delayed because you know life… I’ve had to focus on family and taking care of my energy to celebrate my dad’s life as he passed away peacefully with my brother’s and I by his side at the end of July. The more I look at pictures and have memories pop up, it’s becoming clear that dad was a big influence on my love of nature & water which ties into what I wanted to share with you. I grew up on South Florida beaches and lakes just like dad. My dad was a Bass fisherman his whole life. He later became a hunter after we lived in Louisiana, and he spent time with our Cajun relatives. Thinking of when I was younger, it feels like the longest periods of time I spent with dad was fishing on his Bass boat. He even taught us to water ski behind it. So embarrassing! Dad also loved to sit outside in the morning with his coffee and just watch nature. OK, so he was also known to get his BB gun out to scare away squirrels and raccoons from the pecans or bird feeders. But this Vietnam Army vet, who called yoga therapy “yogurt” while at one of his inpatient rehab stays, had his own way of meditating by calming and grounding himself through nature or on the water. He just didn’t know that’s what he was doing. Here are 3 ways you can easily tap into the healing power of water and nature yourself: 1. CALM YOUR BRAIN: visualize or sit in nature or near water and do some Cooling Breathwork. 2. CALM YOUR BODY: try this Qi Gong "Fountain" exercise. It’s a moving meditation to help you get in the flow and “just be water.” It can be done in sitting or standing. Kids love it. It’s a fun one to do when you need a quick break to clear your mind, calm your body, or recharge. Just 7 reps can make a difference and help you find your flow. Watch this short video to learn how simple it is to do. 3. CHALLENGE YOUR BODY & BRAIN: go Stand Up Paddle Boarding to get the benefits of the calming meditative powers of nature AND the core challenge to your balance & coordination from stabilizing on the water. Hopefully this will inspire you to spend more time in nature or near the water. If you’re not able to get outside, you can do the first two inside. And if you’ve never SUP, well what are you waiting for? It’s so much fun and a great thing to try over Labor Day weekend. Go try some "yogurt" :) Mollie P.S. Summer Savings Alert. It’s time to Roll. Our favorite foam roller is on sale until 9/30/22. It’s like having a PT, Chiro, Massage Therapist in one and the closest we can get to sending our hands home with you. You can find it here*. Then let us show you our favorite massage & stretch moves with the Rollga in one of our online camps. *denotes affiliate link
How's your stretching going?
Did you practice calming your body with gentle stretching vs overstretching like we went over in the last Fit Blog? Hope so because it's time to kick your stretch skills up a notch with the 3-IN-1 Hip Stretch! It's an active recovery stretch for cyclists and spin lovers that takes less than 2 minutes. TBH we’ve held back on sharing this one for a while. We really need you to listen to your body so you don’t injure your knee doing it. Ease into this one especially if you have tight hips, IT Band or knee issues. Before you try these moves, please read through everything below so you get the most out of it and stay safe.
THE 3 STRETCH MOVES:
This 3-IN-1 Hip Stretch sequence is primarily a hip flexor stretch (unlocks the front of the hip) that moves into the fascia above (in your core muscles) and below (in your quad muscles) to work the front fascial line. For each stretch move, breathe and pull your belly up and in. Pace yourself and pause the video if you need more time to focus on your form. Listen to the cues in the video but the overall sequence and flow is:
HOW TO INTENSIFY:
HOW TO MODIFY the Quad Stretch (video at 0:47 and 1:50):
Change the position entirely if needed for the quad stretch so it’s less intense and less fascia stretching at the same time:
OVER TO YOU: The 3-IN-1 Hip Stretch helps open up the front of your hips for better posture and less tension on your back and knees. Once you get these 3 moves down, you can do the flow in less than 2 minutes for active recovery after riding or workouts to release the front of your hips, core and quad’s. You may notice one foot is harder to reach due to hip tightness and that one side is harder to balance due to hip weakness. That's normal but you can balance out and improve overtime with practice. There are a lot of ways you can progress yourself with the 3-IN-1 Hip Stretch as you bring the spring back to your tissue especially if you sit a lot for work or exercise. Enjoy! Team Core Power P.S. Want more stretch moves & massage tools to release your tight & tender hip & core spots? Join us in HIP Camp™. Do you feel pain when you stretch? If so, it’s a sign you’ve gone too far. Remember healthy tissue isn’t stiff. It’s elastic. Bungee cord like versus rope like. You can bring the spring back to your body with stretching no matter your age but there is an art to stretching. Just like we've evolved from flip phones to smart phones, we've made advances in stretching that can help you have better results. First you have to learn to stop over-stretching. If you experience pain with stretching, your body will tighten up more. Why? The body’s response to pain is to protect, tighten up, guard. Gentle stretching is key to stop over-stretching. Stop stretching as far as you can go. Start stretching at about 90% of your pain-free range of motion. The goal is to calm the body so the tissue will lengthen and let go. Here are some basic stretch principles to practice that'll help improve your elasticity: BE GENTLE Don’t force the motion or your body will tighten up. Check in with your face and neck. Are you tensing up because the movement is uncomfortable? That’s a sign you’re stretching too far. BREATHE Always breathe while stretching to help hydrate the tissue and increase the circulation to the area. Slow, deep breaths are calming. FOCUS Be mindful while stretching and focus on what you are feeling in your body as you stretch. Imagine restoring the spring in the tissue vs. pushing to your limits to get taller or more flexible. Stretching the fascia can feel like a burning sensation, but it should go away as soon as you stop stretching. Feel for the tissue to let go, releasing before you stretch farther into the movement. CHANGE THE TEMPO Stretching with proper breathing prepares your nervous system for your next activity. Fast, shallow breaths will turn on your nervous system. Slow, deep breaths will calm your nervous system. Breathe and stretch faster before exercise. Breathe and stretch slower after exercise for recovery. CHECK YOUR FORM Stretch with good form and control. Hold positions for 2-3 breaths before your workouts and a little longer after workouts. MOVE MORE Take mini movement breaks throughout the day to help your fascia be healthy and elastic. It all adds up whether it’s 3 breaths, 3 reps, or 3 minutes of movement. Become more mindful of these principles as you stretch each day to help you feel and move better. Let pain be your guide at first as a sign that you need to back off. Go slow, breathe, and let the tissue let go before you stretch deeper. If you want to make lasting changes in your flexibility and posture, you’ll want to learn how to use fascia stretching and trigger point massage tools. We show you how in our online Rest Camps. Camp routines are designed to help you release your most glued down stuck spots (whether they’re from chronic injuries or intense workouts) in less than 10 minutes a day so you can move & perform pain-free. Get on the interest list here. Let’s get you stretching with (lasting) benefits!  P.S. Maximize your stretch results with this flexibility hack: The One Thing To Do Before You Stretch. |
Mollie, Ender, Ty & Teddie
Mollie Miller, PT
|
 RSS Feed