STRETCH & REST CARE for the wellness warrior |
|
It was an accidental finding. A few months ago, I uncovered an issue I didn’t realize I had until it improved. During the transition to Menopause, I started having significant issues with getting deep sleep. I was stuck in this cycle of poor sleep leading to increased anxiety and a harder time managing stressors that went round and round despite my best efforts. It was impacting my health and performance. I’d been taking Melatonin for almost a year which had helped tremendously but I didn’t want to stay on it long term. I'd made other changes that I've shared to improve my sleep quality as well. I wasn't sure what else I could do. I was always cautioned to stay away from hormone treatments due to my mother’s history of breast cancer. My current medical providers weren’t sure about what to recommend hormone wise either. Very overwhelming and difficult to find any good advice. I kept searching and finally heard about a Menopause Specialist. I did a consult with her in March. As we dug into my symptoms, I realized I’d started having issues with my bladder. Not UTI’s but increased frequency during the day and night. More bathroom trips at night. And if I had a full bladder and coughed or sneezed, I’d have to prep with a pelvic floor contraction or I might leak. It just kind of snuck up on me over the years. Looking back... my bladder was slowly becoming overactive. Estrogen plays a protective role in our Bladder Health as well as preventing vaginal atrophy and dryness. It keeps the urinary tract and vaginal tissue healthy and flexible. Turns out I was a candidate for low dose vaginal estrogen therapy (i.e. Estradiol 0.01%) as it’s NOT systemically absorbed by the body. It's a local treatment. The first week I used it, I slept better than I had in YEARS. The biggest change- my bladder wasn’t waking me up as frequently. It could hold more so I was getting deeper sleep. Bonus Ender's (and our dog-Teddie's) snoring wasn't waking me up! And I was waking up more rested. I stopped Melatonin after a few treatments of vaginal estradiol without any issues. After a few weeks, I was rarely waking up to go to the bathroom at night. That literally hasn't happened since my late 30's. I also started noticing I didn’t leak if I forgot to prep with a Kegel contraction before a sneeze or cough. After a few months, I’m telling everyone about it. Vaginal Estradiol is safe to use in menopause and post menopause indefinitely for bladder issues (stress or urge incontinence, frequent UTI’s) and/or vaginal issues (pain, dryness, atrophy). The urologists I follow on X can't stop shouting how they give it to all their patient's with frequent UTI's. No more antibiotics. You can even use it as a preventative for atrophy that will occur when there is low Estrogen levels. Atrophy can lead to prolapse of urethra, bladder, vagina, or rectum. Trust me something you do not want to happen if at all possible. It can be used in perimenopause if you’re symptomatic as well. It's typically 1 gram of the cream 2-3 times per week but also comes in tablets. And no it's not messy. So simple and so much to gain. You’ll know after a few applications if your body finds it beneficial. I recommend you talk to your gynecologist or urologist about it (today). NOTE: You may hear that there is a Black Box warning that it should not be used in those with breast cancer or risk of it. Don't freak out- do your research. The data shows local vaginal therapy does NOT increase risk of breast cancer. There are no studies showing it spreads to other areas of the body or blood. It does not increase risk of blood clots, heart disease, or dementia. There are oncologist that recommend it for their breast cancer patients even those in active treatment. Talk to a specialist or keep searching for a physician that can address your symptoms and personal medical history (especially if they're stuck on this issue). I look forward to a day when all post menopausal women will be prescribed vaginal therapy just like we brush our teeth daily. Consider adding it to your Healthy Bladder Toolbox. It's never too late. I've heard stories about women in their 80's and 90's finally getting relief when their daughters got them on it. I’m so grateful that my quest for deep sleep led me to it. Despite my focus on promoting having a healthy pelvic floor, I truly didn't connect the dots on the changes in my own bladder function until I experienced these improvements. Resources:
If you suffer from leaking or frequent urination, there are a few more potential causes to consider besides Bladder irritants and low Estrogen. I’ll share them with you next week. Remember leaking is common with aging but not normal. There is hope. You just have to uncover the cause/s and figure out a plan to address it. To A Healthy Bladder! Mollie P.S. Want better energy, mobility, & strength? Our FREE Summer Workshop & the inside scoop on our next REST Camp: SHINE™ is coming soon! Get on the interest list here.
0 Comments
Has this snuck up on you too? Those trips to the bathroom at night? It's common as we age but there really isn't any research to show it's normal. You may not realize how disruptive to deep sleep every bathroom trip is. I didn't until recently. I've been working on improving my sleep quality for over a year but hadn't really addressed my bladder. I'd connected the dots on drinking fluids late at night with more frequent trips but not much beyond that. It helps me for sure to limit fluids a few hours before bed and just take sips of water if I need it during the night. And last year I'd cut back on caffeine as I became more sensitive to it disrupting my sleep. But there is much more you can do to improve your bladder health and ultimately decrease those trips to the bathroom. Let's start with 6 Bladder irritants you may not be aware of:
Not everyone is sensitive to these but it's worth checking out to help your brain know it doesn't have to send a signal to your bladder to empty at night. Uncovering your sensitivities can also help if you have frequent UTI's (Urinary Tract Infections) or leaking when you sneeze, cough, laugh, or during activity. It might take some detective work and monitoring your bathroom trips to figure out if you're sensitive to any of them. If you do uncover sensitivities, start to reduce how often you consume them especially later in the day. For some, you may have to eliminate them all together. Next up, I'll share what has eliminated my trips to the bathroom most nights AND helped me stop needing Melatonin the first week I started doing it. To Better Sleep! Mollie P.S. Ready for more Energy & Flow? It's almost time for our FREE Summer Workshop & the inside scoop on our next REST Camp: SHINE™! Get on the interest list here. Besides backing up in the car, how often do you twist and look behind you in a day? Computers, phones, and even back up car cameras are messing with our movement patterns. Stiffness and loss of thoracic rotation used to just be related to poor posture and aging but technology is definitely contributing to spine issues. Our bodies & brains weren't meant to be staring at a screen all day. Even if you play a sport like golf or tennis that involves rotation, it's highly unlikely you're playing as much as you look at a screen. Remember our fascia (connective tissue) takes the shape of the thing we do most during the day. It's time to add some Seated Twist breaks to your day or when sitting at the computer for long periods. BENEFITS OF THE SEATED TWIST:
Stop what you're doing and let's do some Seated Twists together.  HOW TO DO A SEATED TWIST:This position targets your mid back muscles and helps with digestion. It can be done sitting in a chair or the floor.
PRO TIP: On each breath, visualize your head and tailbone pulling away from one another as you lengthen through your spine. Focus on getting taller more than twisting. Don't force the twist. Be mindful of your current mobility. I've got a lot of upper body & back tightness so I prefer to do the Seated Twist in a chair. Placing my arm over the back of the chair takes the tightness in my arms out of it and gives me some proprioceptive feedback & resistance so I can have better posture while I'm twisting. Basically, I feel more of a stretch in my spine because it's less fascia stretching. If you have issues with constipation, try 3 twists a day and see how your body responds. Whenever you need an energy boost during the day, do a twist. Your body will love it. Twist It Out! Mollie P.S. If you want better Energy and Mobility, you'll want to get on the wait list for our next REST Camp: SHINE™ - exciting updates & details coming soon! Did you know your brain can release pain relieving hormones that have a stronger effect than morphine on your body? It's true. If you've had a baby or run regularly, you know them well- it's your Endorphins! There are over 20 types of Endorphins which are pain and stress relievers created by the Pituitary Gland & Hypothalamus that attach to the brains reward centers (opioid receptors). They trigger the release of Dopamine and increase our feelings of pleasure and well-being. Signs that you may have low levels of Endorphins can be depression, anxiety, muscle aches, sleep issues, chronic pain associated with fibromyalgia, and even exercise addiction. Although Exercise is one of the best ways to boost Endorphins, there are additional simple moves you can do to increase your levels. My favorite way is through Fascia Stretching and Massage. It's my go to pain management strategy for clients (and myself). I'll never forget the "Endorphin High" I got during the 3 day upper body Fascia Stretch Therapy certification training Ender and I went to years ago. My arms were so tight from all the years of doing manual therapy on clients so by day 2 of just stretching the arms, my lab partner and I could NOT stop laughing. We felt drunk from stretching. It was wild & a bit embarrassing until eventually other classmates had similar reactions. Fascia Stretching is one of the most powerful tools I've found to improve pain, elasticity, & mobility in the body. As a bonus it's a mood booster. It's the foundation to all my camps and coaching programs for a reason. You can also BOOST your Endorphins & Mood with any of these pleasurable activities: 1. Create Art 2. Laugh or vent about stressful situations 3. Dance 4. Eat dark chocolate or spicy foods 5. Drink red wine 6. Have sex Aromatherapy, Acupressure, and Acupuncture are additional therapies that can help increase Endorphin levels. It's possible you've already identified from this list what your body craves on the regular. Can you see how it's telling you what it needs to boost hormones like your Endorphins? If not, pick an Endorphin Booster & be mindful of how your body feels after doing it. Figure out which ones your body likes best & sprinkle them into your daily routine. When you're in pain or need to boost your mood, get some Endorphins flowing. Enjoy the high! Mollie P.S. Ready to learn Fascia Stretching & Massage for daily self-care & pain relief? You'll want to join us for our next round of Rest Camp! Details for SHINE™ are coming soon- join the wait list here. Our 13 year old dog, Teddie, got a home exercise program to strengthen his back and hips at his last vet appointment and that, of course, made me think of 2 FIT TIPS to help YOU get stronger. We’d noticed he was having more stiffness and difficulty getting up from the floor or jumping up onto surfaces. Apparently, it’s common for dogs to start to overuse their stronger front legs as they age and start to develop arthritis/pain in their spine or hips. We went deeper into why that is to satisfy my PT brain, but I won’t bore you with that. More importantly, the discussion reminded me of 2 Healthy Aging Moves to share with you. But first, check out Teddie being a good boy doing his homework: 3 sit to stands every day to strengthen his back and hips/legs. Yes, snacks are included!  Here's Your Homework (without the snacks):1. ADDRESS YOUR WEAK SPOTSTeddie’s vet visit was a great example of how our brain loves to find the easiest way to move so you’ll automatically default to overusing your stronger muscles even if that isn’t an efficient movement pattern. We all have muscle imbalances in our body based on which hand is dominant, what you do all day, or the sport you play. Full body workouts like Yoga and Pilates are a great way to work on strengthening both sides of your body. Tightness or stiffness can also be a sign you’ve got some underlying weakness in your postural and core muscles. If you’re weak, your body will tighten up in key spots to hold you up against gravity. Finding your tight and weak spots will help balance you out. 2. FOCUS ON YOUR LEGSTeddie’s vet visit was also a great reminder of how important it is to keep your legs strong as you age. Have you ever noticed that some folks have difficulty standing up from chairs/sofas as they get older? It’s related to a variety of things- hip weakness, stiffness in their joints, and/or a fear of falling that can develop due to decreased vision, balance, and flexibility. The fear leads to them not leaning their trunk forward enough to stand up and it just spirals from there. And guess what they start to do- overuse their arms to stand up! Just like Teddie… Left unchecked it'll increase their fall risk. Falls are the leading cause of unintentional injury-related deaths for age 65 or older. Having a solid strength training program for your legs is a key component to staying active & agile as you age. Unlike dogs, we can't walk on our hands! Focus on your hip mobility & strength and use these exercises to help you get started. DAILY MOVES: Take Sit to Stand breaks throughout the day. It’ll help counteract all the negative effects sitting has on your posture and joints but also help your heart stay healthy. There is research showing that standing up once every 20 minutes is more effective than walking 15 minutes on a treadmill for cardiovascular and metabolic changes. It’s also more beneficial than standing up 35 times at once. You’ll want to stand up every 20 minutes to overcome the negative effects of sitting. Teddie has to do 3 sit to stands per day but you need to do 3 per hour of sitting.
POWER MOVES: Add these Power Moves to workout routines for stronger legs, hips, and core muscles. OVER TO YOU: Which moves will you start with this week? FYI if you need snacks to get you motivated at first like Teddie, aim for protein snacks (it's OK to sneak in a little dark chocolate too). To Strong Legs! Mollie P.S. Want more help with your tight & weak spots? Our next round of SHINE™ & opportunity to be a part of Rest Crew #2 is coming up soon- get on the waitlist here. What do you do when you’re feeling stuck in a rut? It doesn’t matter if it’s fear, overwhelm, confusion, or cognitive fatigue holding you back. There is one MOVE that can help you start moving forward again. Move Your Body. It’s the best bang for your buck when you’re stuck. Why? Physical activity is the number one way to manage stress and complete a stress cycle. It’s also going to bathe your brain in BDNF (Brain Derived Neurotrophic Factor). A protein that is essential for the survival of neurons (cells that make up the brain). It protects the brain from ischemic damage (damage from lack of oxygen), degeneration (deterioration) and promotes long term memory. Just 20 minutes of any kind of physical activity can boost BDNF levels and improve learning, energy levels, memory, MOOD, focus, even your creativity. Stop beating yourself up or trying to figure out why you’re stuck. Start moving and your brain & body will know what to do. Although any form of movement works, one of my favorite moves when I’m feeling stuck is to take a walk. POWER MOVE: Make it Interval Walking. Research shows it IMPROVES:
HOW TO INTERVAL WALK*:
MODIFY TIP: If you’re overcoming a lower body injury and aren’t ready for that much walking, then do the same thing on a stationary cycle until you can transition to walking more. FIT TIP: The more you enjoy it, the better it is for you. Add your favorite music and the dopamine will start flowing (your pleasure hormone). Next time you’re feeling stuck, go for a walk. It’ll help your brain & body get back in flow so you can move forward. Your heart will love it too. Get Moving! Mollie P.S. For more on the benefits of Interval Training and some more workout recommendations, check out this FIT Blog: How To Get Stronger in 1 Minute *From the book: The One Minute Workout by Martin Gibala, Ph.D. **For intensity guidance, refer to the Modified Borg RPE (Rating of Perceived Exertion) Scale from 1 (extremely easy) -10 (extremely hard or max effort). Have you picked your 1 thing for 2024? That one goal you want to focus on? It could be improving your
Whatever it is, let's set you up for success. Use this brain hack to help you create lasting transformation as you develop your new habits: Celebrate Your Wins. If you’re trying to change behavior, you’ll want to celebrate more often. BJ Fogg, Stanford Behavior Scientist, has found that when we connect celebrating ourselves with new habits we are trying to change it’ll help you build a new behavior. When you celebrate a win, it sets off a physiological reaction that releases the happy chemicals in your brain and connects it to whatever you are celebrating. The more you celebrate something and associate it with feeling good, it’s more likely you will do it. Sort of sounds like dog training, doesn't it? Reward the good behaviors and you’ll get more of them. Also some parenting approaches. Since we’re all about Daily Mini Moves to help you have more energy, ease and flow, celebrating your wins to reinforce healthy habits will give you the dopamine hit your brain & body love instead of that bag of chips, the donut, the alcohol, the Netflix binge. Daily practice will get in the brain reps in that are needed to lay down new neural pathways until it’s an engrained, automatic healthy habit, or routine. If you want to go deeper, BJ Fogg’s website is full of resources including his book “Tiny Habits: The Small Habits That Change Everything.” Over To You:
We're here to celebrate your Wellness Wins & help you grow your Rest Toolbox so you can have a Calm, Strong, Rested Body and stay active & agile no matter your age. Cheers to a Peaceful, Playful, Joyful 2024! XO- Mollie, Ender, & Team Core Power We believe Rested Healers, Leaders, & Creators will heal the planet. Let’s Rest More To Heal More. Your Body. Others. The Planet. Have you heard of the Blue Zones? Areas around the world that have a high population of thriving 100 year olds. Ender and I started watching the Netflix series: Live to 100- Secrets of the Blue Zones. Studies are ongoing about their food, exercise, and lifestyles to find any commonalities among these wise souls. Even though it's been 19 years, we both vividly remember an encounter with the most hilarious, sharp witted gentleman in the tiny fishing village of La Sabana, Venezuela where we got married. We ran into him walking on the beach as he did every day. The town elder. Playful and proud of his age. We actually didn't believe it when he told us he was 100. He moved and looked like a 50 year old. I was blown away by his balance on the sand. He had to get another local to back up his story for us to finally believe him. He kept the beach clean and walked all over the town every day checking on and joking with his friends. His diet mostly fish and veggies. He was a character just like the folks you'll see in the Netflix series. In the first episode they brought up one of my top tips for staying active and agile as you age. It's something most people stop doing as they get older. Can you guess what it is? It's a great move and JLO song... Get ON THE FLOOR! Episode one refers to the Sit and Raise Test. It's been researched as a longevity test and tooted as a predictor of how long you will live. 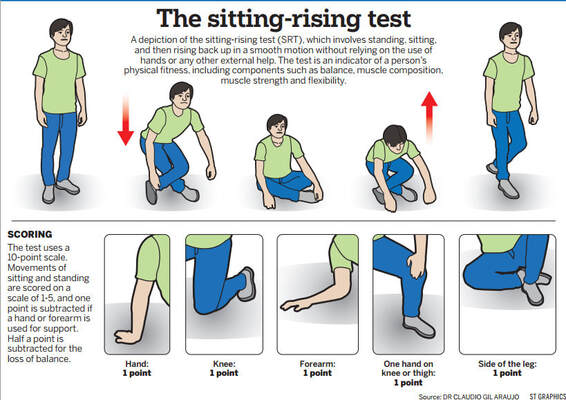 Photo Source Credit: Singapore Times Whether or not this test truly predicts how long you'll live, it's a great test to check in on where the tight and weak spots are in your legs. You can try it if you don't have any major joint issues or just pay attention to where you struggle when you try to get up and down from the floor (even if you have to hold onto something). If you can't even attempt to get down on the floor, well that tells you a lot also. It's OK if you've stopped or avoid getting on the floor. Don't beat yourself up about it. One of the reasons I love yoga and pilates is they encourage us to get on the mat (floor) regularly. Unless you practice a religion that prays on the floor, have a job that involves getting on the floor (i.e. working with kids), or are from a culture that eats meals seated on the floor, you'll have to be more intentional about getting some floor time as you age. You need floor time just like babies need their tummy time! The mobility and strength to get up and down from the floor can help prevent falls as you age. Falls are the leading cause of unintentional injury-related deaths for age 65 or older. If you struggle getting on and off the floor without using your arms, support or losing your balance, then it's time to start working on your hip mobility and strength. We've got you! Here are 2 ways to get started: Over To You: Grab your mat and get some floor time in this week. Cheers to Healthy Aging (& walking on the beach at 100)! Mollie P.S. Ho. Ho. Ho. It’s time to Roll. Our favorite foam roller is on sale until 12/31/23. It’s like having a PT, Chiro, Massage Therapist in one and the closest we can get to sending our hands home with you. You can find it here*. P.P.S. The waitlist for our new REST Camp is open & Week 2 Rest Moves will help you work on your mobility (moving with ease) from head to toe with your new foam roller. GET ON THE LIST *indicates affiliate link Did you get to test out any new sleep moves from last month's FIT Blog? Hope so. Besides staying on top of a healthy sleep routine this summer, I've got some tips to help you stay strong AND rested. If you're traveling, they'll help you prep for your next trip so you can be a well-rested travel warrior. 1. Strong Body- use 1 Minute Workouts to stay on top of your strength training when you're short on time. Super Bands* travel easily so you can exercise on the go. 2. Strong Gut- eat a balanced breakfast, drink green juice or powder to get in your veggies, pack healthy snacks, and stay HYDRATED! 3. Rested Body & Brain- breathe, stretch, and move to calm your body as much as possible especially when traveling to help your body & brain heal itself & get stronger. Find moments during the day to relax with naps, nature, or daydreaming. Use your sleep moves to prep your body and the room before sleep. Download the Healthy Traveler Packing List for more immune boosting nutrition & exercise resources. Stay Summer Strong! Mollie P.S. If you’re a caregiver or a healer that's experienced burnout, we’ve got a special program coming soon designed specifically for you! The wait list opens up soon. *indicates affiliate link There is one recommendation I share with all my clients. It doesn't matter if they have a strength or mobility issue. It doesn't matter if they have an ortho or a neuro issue. Or whether we are working on improving their pain, posture, or power. What is it? It's a hip check up. Why the hips? Movement begins at the hips. Your hips don’t lie. Imbalances in strength and flexibility of your hips will cause issues all throughout your body because everything’s connected to everything through your fascia (connective tissue). Fascia is the tough connective tissue that spreads throughout your body in a three-dimensional web from head to toe. It holds everything together from your bones and organs to the nerves, blood vessels and muscles. There are over 10 fascial lines running superficial to deep throughout your body that connect specific muscles. Did you know pain in your foot or neck can be coming from a tight hip? Since your hips are at the center of your body, tightness in your hips will pull on the end of the lines. Imagine pressing on the center of a spider web. What happens? The edges get pulled in. The same thing happens in your body. Tight spots in the body put tension somewhere on the fascial line resulting in stiffness and/or pain. If you find and release the tight spots in your fascia instead of focusing on one muscle at a time, you can improve the mobility of the entire line. Better mobility helps prevent injury, re-balance your nervous system, decrease inflammation/pain and improve your posture no matter your age or how many injuries you've had over the years. Start in the center of your body. Find your tender and tight spots in your hips then work your way down the line toward your head and feet to lengthen the fascia to make lasting changes in your posture and flexibility. Here's a hip spot to target first: Your Gluts! Grab a ball and do a hip check up to help release your tender and tight spots using the following massage & stretch moves. HIP MASSAGE MOVES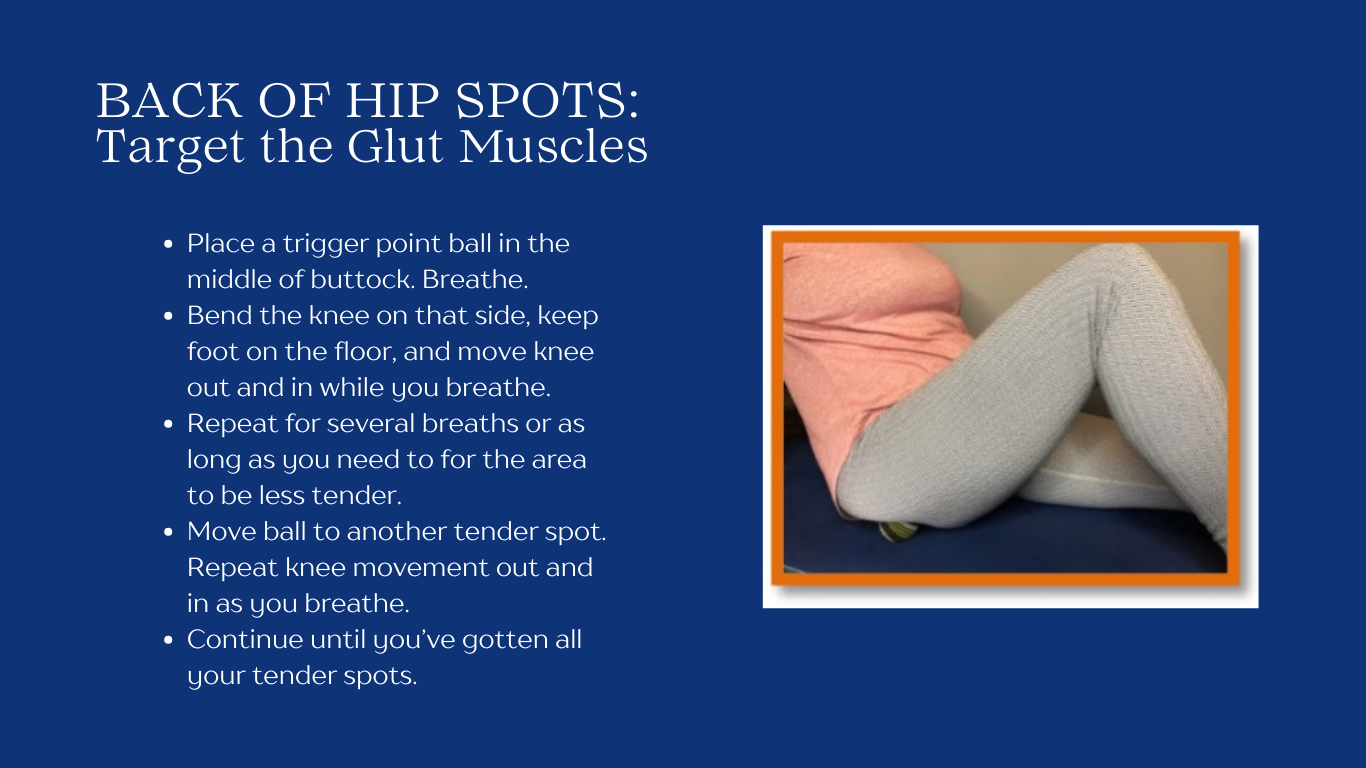 HIP STRETCH MOVES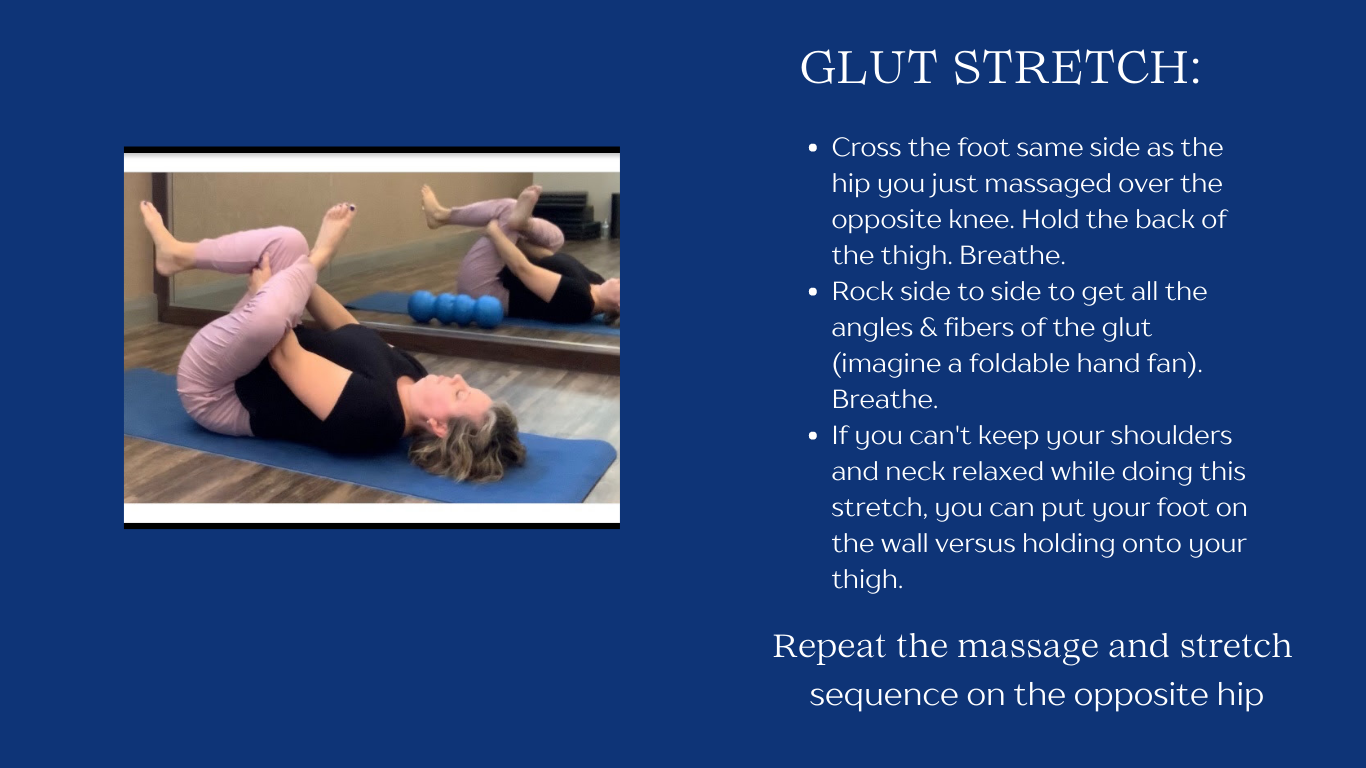 Be gentle. Go slow, breathe, and let the tissue let go without forcing it before you massage or stretch deeper. Let pain be your guide at first as a sign that you need to back off or for how much pressure or stretch to do. If you find some tender or tight spots on one side, give that side more attention. If you don't feel tender or tight, then you've got healthy hips. Go You! It's pretty common to have spots in the gluts when you sit a lot or are very active, especially if you don't have a daily stretch care routine for recovery. Regardless of what you find, here are 3 more stretch moves that will help you open up and have healthy hips.  P.S. Want to get stronger with less effort? Download this 3 minute Active Recovery Yoga Routine to help you train smarter, it's free! Download It Now We do not provide medical advice. You should consult your physician prior to beginning any new exercise program. |
Mollie, Ender, Ty & Teddie
Mollie Miller, PT
|
 RSS Feed