STRETCH & REST CARE for the wellness warrior |
|
Before you jump into your core workouts, try these moves to help turn on your core and maximize your results. OPEN UP YOUR HIPS: tight hips can make it harder to contract the pelvic floor muscles (the base of your core). In fact, tight hips can pretty much turn off your pelvic floor. Stretch the front and back of your hips with a runner’s lunge and full squat to prep for a core workout. WARM UP YOUR SPINE: The Baby Get Up is one of our favorites for warming up your spine and turning on your core before a workout. CHECK YOUR FORM: Use this Head To Toe Posture Checklist to turn on your deep core stabilizer muscles and reset your posture during workouts. Be mindful of these spots for better form and check in frequently from head to toe that you’ve got yourself lined up during your core workouts. Here is the Head To Toe Posture Checklist and posture cues to become familiar with and the video to walk you through the following spots.
HEAD TO TOE POSTURE CHECKLIST VIDEO Becoming mindful of these key spots from head to toe during your core, Pilates or Yoga workouts will help you improve your posture overtime. Using good form during your workouts WILL carry over into your day. You can take these posture cues out of the gym or off the mat to help reset your posture anytime during your day. Better posture equals more confidence, better performance, and decreased risk for injury. You’ll walk, run, bike, row, and move better. Prep, Reset, Reshape! Mollie P.S. Download the Head To Toe Posture Checklist Video to reset your posture during your day.
0 Comments
Exciting news! Mini Massage Camp™ is ready to roll. You'll find details below. But first, let's talk about pain down there. This is Part 3 of the Pelvic Floor Series to help you have a strong, healthy pelvic floor for better core workouts, posture and performance. We've addressed how to do a proper Kegel exercise (part 1) and how to trouble shoot the more common mistakes of the Kegel (part 2). Now let's talk about what you can do to address pain or injuries to the pelvic floor muscles. Pain anywhere in your body can turn off the muscle that is inflamed or hurting. Your pelvic floor muscles can be injured just like any muscle resulting in painful scars and trigger points, weakness, or soft tissue restrictions. Damage to these muscles can occur due to:
Injuries to the pelvic floor muscles can lead to pain or decreased sensation with sex, incontinence (leaking of urine or bowel), or organ prolapse (bladder, uterus or rectum drops lower). Fortunately there are treatment options to help rehab the pelvic floor after injury:
All of these rehab techniques can be done externally (in the pelvic, lower abdominal and back region) or internally (through the vagina or anus). Let’s break this down more. External Pelvic Floor Rehab addresses pain from an outside approach. A Physical Therapist, especially one experienced with manual therapy and Pilates Rehab, will have the skills to provide exercise and treatment to stretch, strengthen, and release adhesions in the muscles around the hips, pelvis, and core. Pilates Rehab with pelvic floor retraining is how I healed from a back injury that almost caused me to retire from PT in my 20's. I still use the exercises along with fascial bodywork tools to help my pelvic floor and core stay healthy and pain-free. These are the techniques I have taught my clients for years, many who had pelvic floor dysfunction or back pain, and now teach in my online camps. Internal Pelvic Floor Rehab addresses pain from an inside approach. These specialists are certified to work internally on the pelvic floor muscles to stretch, strengthen and relax muscles in the lower pelvis. They're usually Physical Therapists or Nurse Practitioners with advanced training in this area. They can do manual therapy internally to release restrictions, biofeedback training to help strengthen, guide vaginal weight training for prolapse (i.e. vaginal pessary training), and design an exercise program to address your specific needs. If you've had an injury to your pelvic floor muscles that has resulted in pain, scarring or incontinence (leaking of urine or bowel), reach out to your OB/GYN, Urologist, or Midwife for a referral to a Pelvic Floor Specialist in your area. Internal pelvic floor rehab is a treatment to consider for decreased sensation or pain during sex as well. If you experience painful orgasms (dysorgasmia), this Mind Body Green article has 17 treatment and tips that you might find helpful. If these more conservative approaches listed here don't help, there are medications and surgical options available. In addition, acupuncture or lifestyle changes for weight loss may be beneficial. These issues can be debilitating but are treatable. Don’t give up. Keep searching for someone to help you with your issue. It's never too late! Mollie P.S. Ready to have more freedom & flow in less than 10 minutes a day? You’ll want to check out Mini Massage Camp™! Learn more. It's time for more Kegel talk. A simple movement that can turn complicated quickly. In Part 2 of this series, we’ll be troubleshooting some of the more common Kegel mistakes to help you have a strong, healthy pelvic floor for better core workouts, posture, and performance. Quick review: One of the most neglected areas of the body and least talked about until you’ve got an issue down there, is how to have a healthy pelvic floor (PF). The pelvic floor muscles are important for all ages but can need more attention as you age. They form the base of your core and support all your organs. The Kegel exercise is the basic way to strengthen them. We reviewed how to do a proper Kegel in this blog post. Here’s the challenge of the Kegel... A proper Kegel is done when you can contract the PF without the rest of your body tensing up. Easier said than done, especially when you start moving your body while you Kegel. Let’s do some troubleshooting on how to avoid the more common mistakes when you Kegel. Do a check in while you Kegel. Are you?
Here are some tips to prep for the Kegel and take the tension out of your body:
 OTHER AREAS TO ADDRESS FOR A HEALTHY PELVIC FLOOR A few other issues you’ll want to pay attention to as you improve the overall health of your Pelvic Floor Muscles: Pelvic Floor & Constipation Constipation and doing the Valsalva maneuver (holding breath and bearing down when lifting or pooping) can over stretch the PF muscles. Improving the health of your gut can take pressure off your PF muscles that have the job of holding up your organs. Do you have any GI issues? 1 in 4 Americans do. You could have up to 15 # of mucus from inflammation in your gut. Signs are painful joints, bulging belly, bloating. All that puts load on your PF muscles. You can decrease inflammation through clean eating with lots of green veggies, eliminating foods that irritate (dairy, refined sugar, gluten), staying well hydrated, doing a quarterly detox/cleanse, taking probiotics and exercising regularly. You might also want to check out The Squatty Potty™, a toilet stool that puts your body in the best posture for pooping to take pressure off your PF. Pelvic Floor & Hormones If you identify as female and still bleed monthly, you might notice that it’s easier to do Kegels during the middle of your cycle and more difficult at the beginning of it due to hormone changes. Just keep at it but be mindful of your cycle and plan your more intense workouts toward the middle of it when your pelvic floor muscles might be at their best. Pelvic Floor & Fatigue The pelvic floor muscles can fluctuate in endurance just like any muscle. Sometimes you can turn them on but not keep them on because of fatigue. Or you may notice you can turn them on with bladder empty but not with weight of full bladder (or when constipated). The weight of your organs may challenge the PF when tired. That’s OK – you just need to build your strength and endurance like you would any other muscle. For strengthening, use the weight of gravity to challenge your PF. Example: going from laying down to sitting to standing to moving your body as you Kegel. Each position has to deal with more and more gravity. For endurance, add reps throughout the day to challenge your PF. Once you can do a proper Kegel in sitting, you can practice anytime throughout the day to build endurance- while driving, watching TV, standing in line. The more complicated the activity you are doing, the more challenging it will be to hold the Kegel and breathe. The more mindful you can be of your form while holding your Kegel, will help guide you on when to challenge yourself with more gravity or moving your body. When you can’t hold the Kegel without tensing up in a position, you may have pushed too fast or done too many reps in that position. Listen to your body. It’ll guide you. You'll know when you need a rest break or it's time to slow down. You've got this! Mollie
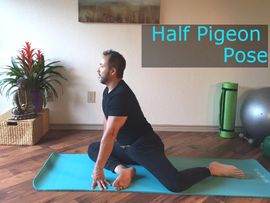
Got tight hips? No problem, we've got 3 moves to help you not only open up your hips where we trap a lot of our emotions (especially women or those who identify as female) but challenge your stability and balance: The Warrior Moves Daily Hip Routine.
How to Modify: modify the routine by holding onto a counter, wall or chair.
How to Intensify: make the routine more challenging by holding the positions longer than in the video or by going through the routine more than once. To Healthy Hips! Mollie P.S. Ready to have a calm, strong, well-rested body? Our online bodywork camps will not only help you Move With Ease but every camp sale supports an organization that improves the health & welfare of animals and wild life like the Beagle Freedom Project & Sheldrick Wildlife Trust. Learn more. It’s about that time of year. The time when we get lots of questions about how to get rid of neck pain. Maybe it’s all the online shopping? Here is what we recommend to let the healing begin. As always, anytime you have pain you want to calm things down. First step is to decrease the inflammation. Next CHECK IN on these 3 areas: Hip Check In- stiff muscles or tightness causing pain in your neck can be a sign that you’ve got some underlying weakness in your core and postural muscles. Why check your hips when you’ve got neck pain? All movement begins at the hips which are the base of your core. Your hips don’t lie. Imbalances in strength and mobility of your hips will cause issues all throughout the body. Wait what? Yes it's true and because everything’s connected to everything through your fascia (connective tissue). If your hips are tight and pelvic floor muscles are weak, then your neck may be working overtime to hold you up against gravity. Posture Check In- it’s important to check that you aren’t straining your neck with your positioning in bed and wherever you sit for long periods (i.e. office chair, sofa, car seat). Bed Tips: How many pillows do you sleep with? You want to find just the right amount of support particularly in your neck area so that you aren’t too flexed or too flat. You’ll need to take into consideration if you sleep on your back, side or belly. They make pillows for all types of sleepers now. Find one that fits you just right. If your neck is flared up, you might need some extra support in the curve of your neck just below the base of your skull. You can roll up a towel and place it in the bottom of your pillowcase for some extra support. If you’re a belly sleeper, a good goal would be to try and become a side sleeper. You could even get a body pillow and sleep halfway between your side and belly sleeping for less stress on your neck. Chair Tips: ideally you want to sit in a position with good low back support that encourages you to sit with your shoulders over your hips and head in line with your spine. Try to have your elbows supported to take tension out of your shoulders and put any screen at eye level to avoid slumping over and flexing your neck too much. Standing desks work for some folks also to break up their sitting time. It’s impossible to have perfect posture all day long but you can become more mindful of how you sit and take frequent movement breaks to reset your posture and help your tissue stay hydrated throughout the day. Stress Check In- most of us are aware that when we are stressed, we hold tension in our necks. Taking simple relaxation breaks from 3 reps to 3 minutes throughout the day will help you calm your nervous system and help you feel more ease each day. Now that you’ve checked in, which of these areas needs some attention? Keep that in mind as you work on the next step: moving without pain. NECK BASIC MOBILITY WORK Here are a few gentle movements to help relieve neck tension or pain. Relaxing your face- There are 2 simple moves that can help you relax your face and put less tension on your neck. Smiling and putting your tongue on the roof of your mouth while you breathe. I know it seems too simple but try it while you are working on the computer or working out to see if it helps keep tension out of your neck. Relaxing your shoulders- Good form is important not only in sitting but when you are lifting weights or doing arm movements during Pilates or Yoga exercises. Check in and make sure your shoulders are not pulled up toward your ears (elevated) when you are sitting, cooking, driving, working out, talking on the phone. Instead keep your shoulder blades pulled down toward your hips and think arm pits to hips as you move and go through your day. Chin Tuck Exercise- Sit up tall, shoulders over hips, arm pits to hips and gently move your chin back toward your spine like you’re making a double chin. Think about lengthening the back of your neck. Repeat 10 times as long as this doesn’t increase your pain. Rule of thumb: if a movement makes your pain worse, don’t do it or modify it. Nose Circles Exercise- Sit up tall with good posture and move your nose in a circle like you are drawing a circle the size of an orange. Repeat 5-10 times then reverse directions and repeat circles 5-10 more times. Modifications: If you’re super flared-up, you might want to do the Chin Tucks and Nose Circles laying on your back with a supportive pillow or towel roll. Bend your knees with feet flat on floor to take even more tension off your spine. You can do these several times a day especially at the end of your day. When someone has a recent injury, you typically have them do 10 reps every hour to help calm the area and get out of the pain cycle. Remember we want to calm the body when it’s in pain. As things calm down and you’re able to move better without pain, the next step is to turn on your postural muscles with stability exercises. POSTURE WORK FOR NECK PAIN Even though you are dealing with a neck issue, you want to start with stability exercises aimed at strengthening your hips and pelvic floor muscles to help improve your posture and take tension off your neck. You can literally reshape your body with a few minutes of daily fascial body work. We show you how to improve the mobility and stability of your hips and spine using fascial stretching, massage and stability work in our online program, HIP Camp™: Stretch & Rest Care Tools To Reshape Your Body. Learn more here. WHEN TO SEEK HELP WITH PAIN If you have sharp or constant pain or start to lose sensation or control of any muscles, it’s time to call your doctor. Seek medical help immediately when you have an acute (new) injury. If you’ve been diagnosed with a herniated disc or have numbness/tingling into your arm, you will need a health care professional to guide you with your recovery. You’ll want to find someone that has strong manual therapy skills and training with myofascial tools like cupping, kinesiotaping or dry needling. You may benefit from traction techniques also. Your provider should also give you a home exercise program to do between sessions. Don’t forget you are still fragile as you are healing. Go slow as you get back to normal activities even when you start to feel better or have less pain. Heal Well! Mollie P.S. Ho. Ho. Ho. It’s time to Roll. Our favorite foam roller is 30% off this month. It’s like having a PT, Chiro, Massage Therapist in one and the closest we can get to sending our hands home with you. You can find it here*. In our online program, HIP Camp™, we show you how to use the foam roller & more to help you reshape your body for better energy, mobility and posture. Learn more here. For more stress management tips, download this Daily Planner to help you add 1-3 minute rest & relaxation breaks into your day. DIY Self Care Book Resource for Neck Pain: McKenzie Method- Treat Your Own Neck. Available in English and Spanish. You can find it on Amazon or here. For more for tips on having good form during workouts, refer to this Fit Blog. For suggestions on how to build your rehab team, refer to this Fit Blog. *denotes affiliate link
Ready to have some fun? Dust off your mat. It’s time to try the Baby Get Up.
Baby Get Up is one of our favorites for warming up your spine and turning on your core before a workout. To be honest, I stole this exercise from Ender. His athletes all love it. But I've spiced it up for you. Besides being a great prep for your workouts, it’ll give you some feedback on which side of your body is tighter and which side is less coordinated. Remember we all have a difference between the right and left side of our bodies because of which hand is dominate and what we do all day. As you do the Baby Get Up, which side is more clunky or feels harder to do? That’s the side that needs more reps or attention. Before you try it, please read through everything below so you get the most out of it and stay safe.
Watch the video one time before you try it (it’s only 1.5 minutes). You’ll find some more details below the video on how to do it safely. If you can’t even attempt it safely due to pain or tightness, you need to get yourself into HIP Camp™ to unlock your tight & tender spots using our favorite bodywork tools. It’s never too late to improve your mobility and strength, but you probably need some tools to help you. OK, let’s do it. Watch the video then test it out. HOW TO DO THE BABY GET UP
TIPS TO MODIFY THE BABY GET UP You can modify by holding your knees as you rock, using your elbow on the floor as you rock, or make the rocking motion smaller. EXERCISES TO DO AFTER THE BABY GET UP If you love Pilates Mat Work, you could add on the following exercises after your Baby Get Up’s:
If you love resistance training, do some band work that targets your shoulder, core and hips after the Baby Get Ups. If you love Yoga, do some Warrior Poses after the Baby Get Ups. Lastly, Baby Get Ups are an excellent warm up for the old school Turkish Get Up Exercise. If you can’t decide, do them all in the order I wrote them for an awesome core workout that targets and balances both sides of your body. A few reps with good form of each exercise will improve your mobility, strength, and overall posture. And if you’ve got kiddos, it’s a good one to show them. Have fun with it! Mollie (& Ender) P.S. Want to reshape your body and have better mobility, posture and energy? Check out HIP Camp™.
Disclaimer: We do not provide medical advice. Always consult with your physician before starting a new fitness or wellness program.
Have you gotten clear on your ONE fitness goal for January 2020? Does it include having more energy and less inflammation in your body? Is 2020 the year you become a joyful & well-rested Wellness Warrior? If so, we’ve put together a few NEW YEARS deals on our online bodywork camps to help you get started without burning yourself out. They’ll help you take the first step to having more energy, ease & flow each day… by giving your body the gift of stretching and massage to release your tight & tender spots with less than 10 minutes of daily self-care (or what we call "stretch-care"). Both camps begin on January 6th. At this time of year when there’s a ton of pressure to speed things up and change everything about your workouts and diet, we want to show you the benefits of slowing things down. Let’s set you up for success by breaking the habit of going too hard, too fast. It’s THE recipe for inflammation, injury and burnout. Instead let's calm your body with daily fascial stretch-care and bodywork tools so it has time to work its magic...to heal itself and get stronger. Your body gets stronger at rest. You can train smarter by resting harder whether it's to support your workouts or your wellness. Our bodywork camps show you how easy it is to do this. They lay the ground work for you to stay active, agile, & pain-free at any age. It’s like when the flight attendant says to “put on your oxygen mask first.” Our camps are the "oxygen" for a strong, well-rested body & mind. Our online bodywork camps are on special until December 31st. Choose the one that is the best fit for your body's needs right now. GETTING STARTED WITH YOUR STRETCH-CARE: If you’re a newbie to fascial stretch-care, our online MINI Bodywork Camp™ (How to Foam Roll & Massage for More Freedom & Flow) will help you get started with a simple daily foam roller routine. You'll learn how to use our favorite flexibility hack, foam roller massage, to calm your body for better mobility & stretch results- it’s 50% off for a limited time. Learn more. GOING PRO WITH YOUR STRETCH-CARE: If you’re ready to take a deeper dive into improving your mobility for better posture & faster recovery from workouts, you’ll want to check out the special we’ve got on HIP Camp™ (Stretch Care & Recovery Tools for the Mindful Athlete). It includes an AWESOME bonus holiday offer: The Pelvic Floor 5 Day Strength Challenge. HIP Camp™ is our 4 week online base training program that will help you build a strong core with a well-rested body & mind. We'll walk you through our simple system to find & treat ALL your spots- the tight, tender, weak (& tired) spots to make lasting changes in your mobility & performance. You can get $150 off when you pay in full or we have a new payment plan option available with this special offer. Learn more. It’s time to renew & refresh yourself in 2020. Let’s do this! Mollie & Ender P.S. All holiday deals and bonus offers expire Tuesday, December 31st at 5pm CST. The Pelvic Floor 5 Day Strength Challenge is a BONUS offer when you purchase HIP Camp™ by December 31st. It includes a pop-up Facebook Group for coaching & support beginning February 3rd. We’ll have daily challenges + office hours for questions, prizes, and cover strength, cardio, & clean eating exercises to improve the health of your pelvic floor & more. It’s the perfect compliment to HIP Camp™ trainings. Learn more about camp here. Real quick, let’s do a body check.
How well are you moving without pain or stiffness? Mobility is your ability to move without pain or restrictions during your daily activities. So how are you doing with that? Before you throw the age card out, here me as I gently call B.S. to that. It's NOT a sign of healthy aging to wake up or end the day with a lot of tightness or soreness. Healthy tissue doesn’t hurt. It isn’t tender to touch. It isn’t stiff. It doesn’t hurt when you move. Inflammation, soreness and stiffness are signs of inflammation and over-training (or over-doing). I know you go, go, go and never take a time out to allow your body to rest. I see you... Seriously, you may not be giving your body enough rest and recovery time between your workouts and activities. Stiff, sore muscles are signs you need to slow down and work on your mobility. Most people think about stretching as the way to better mobility. We’re asked all the time what's the best way to stretch for this or that. Yes, gentle stretching is a great way to work on your tight spots and improving your flexibility. Going after your tight spots is one piece of the mobility puzzle. But there's a flexibility hack you can do to maximize your stretch results. It's a way to make lasting changes to your mobility, posture, and performance. Want to get better results with less effort when you exercise? Here's a cool fitness tip for you to test. One of the best things I started doing a few years ago was planning my day around my body’s natural rhythms and peak times. If you pay attention, you can figure out your peak times for exercise, work, and other activities. Peak Time check in: When are you at your best? One of the first steps to know your peak time for exercise is figuring out if you’re a lark or a night owl. In the research, a LARK is defined as an EARLY RISER or what you might refer to as a morning person. A NIGHT OWL is someone who naturally goes to bed at 1 or 2am. The summer is a great time to figure out which one you are naturally especially if you’re on vacation. When you don’t have an alarm clock, when do you naturally wake up or go to bed? The goal is to exercise, train, or do physical activity when you’re at your peak time. The best time for LARKS is to exercise is between 7am to midday. And the best time for NIGHT OWLS to exercise is around 8pm. Schedule your workouts or training at your peak time to perform better with less effort. You’ll naturally have more energy during and after exercise plus it’ll be less depleting to your body overall. I realize work and other commitments can interfere with your ability to do this all the time. Just do your best to block it off. Be creative and mindful as you plan your workouts to see if you can shift any of your current activities to support your peak times. Even if you do this 20% of the time, you’ll feel a huge difference in your energy and performance. Have fun! Mollie P.S. Download this free daily planner to help you pick out a few self-care & mini moves each morning. Your body will love them! Do you wake up feeling well-rested and pain-free on most days? Did you know that’s even possible? Lots of clients tell us they’ve always been tight, are living with aches and pains, and assume they always will be. Because that’s what happens when you get older, right? Absolutely not! You’re not destined to a life of stiff or sore muscles, slowing down, and eventually falling and breaking your hip. Stiff joints, sore muscles, and fatigue are all signs of over-training (or over-doing) and not giving your body enough rest or recovery time between your workouts and activities. Your body needs time to work its magic…to heal and repair itself. Stiff, sore muscles are also signs you need to work on your mobility or flexibility. The truth is… You can win the battle against gravity, sitting, adhesions from old injuries, and the impact exercise has on your body’s flexibility as you age. It’s possible even if you’ve never touched your toes. It’s about technique and knowing what to target. Once you know the fundamentals, you can see how easy they are to sprinkle into your day. The pill-free way… So, how can you stop struggling with stiff, sore muscles and fatigue? You can stretch. You know that thing you skip when you're trying to squeeze in a quick workout. But, here's the deal. Healthy tissue isn’t stiff. It’s elastic. Bungee cord like versus rope like. Is that how you feel when you move right now? If not, it’s OK because it’s never too late to improve your flexibility. The first step… Stretching is the first step to bringing the spring back into your tissue (after having good hydration and sleep habits). And it doesn't take a lot of time when you know what to target and what to do before and after you stretch. Just like we’ve evolved from flip phones to smart phones, we’ve made advances in stretching that’ll make a lasting impact on your flexibility and posture. If you feel pain with stretching, you’ve gone too far… There’s nothing more annoying than seeing an athlete on the sidelines getting his hamstring cranked on by a trainer. There is such a thing as over-stretching. Bottom line: if you have pain with stretching, your body will tighten up more. The body’s response to pain is to protect, tighten up, guard. And since you’re the best judge of what’s painful or not, you’re the one who should be the stretch “super star” of your body. You can help your body stay active, agile, & pain-free at any age when you know # 1 thing to target with your stretching and how to stop over-stretching. We’ll show you how in our FREE training, MINI MOVES: How to have more energy, ease, and flow in your workouts (& life). In this free mini training series, you’ll learn:
READY TO BE ACTIVE & AGILE AT ANY AGE?The technique we’ll share with you can benefit everyone. We’ve used it on clients with chronic neck or back pain to professional athletes. Our pros always seem to achieve their personal best after a treatment (i.e. no hitter, new race time). Are we promising you’ll become as flexible as a prima ballerina if you stretch daily? No, anatomy and genetics does play a role. But it’s never too late to improve your flexibility… if you’re willing to spend 10 minutes a day on simple self-care stretches and moves. Let's get you stretching with (lasting) benefits! Mollie & Ender P.S. Sign up before 6/10/19 to get the free Mini Moves training – it's in 3 short parts (just like your stretch self-care can be) to help you feel better, move better, and ultimately live better. |
Mollie, Ender, Ty & Teddie
Mollie Miller, PT
|
 RSS Feed