STRETCH & REST CARE for the wellness warrior |
|
I’ve known what I wanted to share with you this month, but it’s been delayed because you know life… I’ve had to focus on family and taking care of my energy to celebrate my dad’s life as he passed away peacefully with my brother’s and I by his side at the end of July. The more I look at pictures and have memories pop up, it’s becoming clear that dad was a big influence on my love of nature & water which ties into what I wanted to share with you. I grew up on South Florida beaches and lakes just like dad. My dad was a Bass fisherman his whole life. He later became a hunter after we lived in Louisiana, and he spent time with our Cajun relatives. Thinking of when I was younger, it feels like the longest periods of time I spent with dad was fishing on his Bass boat. He even taught us to water ski behind it. So embarrassing! Dad also loved to sit outside in the morning with his coffee and just watch nature. OK, so he was also known to get his BB gun out to scare away squirrels and raccoons from the pecans or bird feeders. But this Vietnam Army vet, who called yoga therapy “yogurt” while at one of his inpatient rehab stays, had his own way of meditating by calming and grounding himself through nature or on the water. He just didn’t know that’s what he was doing. Here are 3 ways you can easily tap into the healing power of water and nature yourself: 1. CALM YOUR BRAIN: visualize or sit in nature or near water and do some Cooling Breathwork. 2. CALM YOUR BODY: try this Qi Gong "Fountain" exercise. It’s a moving meditation to help you get in the flow and “just be water.” It can be done in sitting or standing. Kids love it. It’s a fun one to do when you need a quick break to clear your mind, calm your body, or recharge. Just 7 reps can make a difference and help you find your flow. Watch this short video to learn how simple it is to do. 3. CHALLENGE YOUR BODY & BRAIN: go Stand Up Paddle Boarding to get the benefits of the calming meditative powers of nature AND the core challenge to your balance & coordination from stabilizing on the water. Hopefully this will inspire you to spend more time in nature or near the water. If you’re not able to get outside, you can do the first two inside. And if you’ve never SUP, well what are you waiting for? It’s so much fun and a great thing to try over Labor Day weekend. Go try some "yogurt" :) Mollie P.S. Summer Savings Alert. It’s time to Roll. Our favorite foam roller is on sale until 9/30/22. It’s like having a PT, Chiro, Massage Therapist in one and the closest we can get to sending our hands home with you. You can find it here*. Then let us show you our favorite massage & stretch moves with the Rollga in one of our online camps. *denotes affiliate link
0 Comments
It’s time… to give yourself the gift of rest. I know how foreign rest is to so many of us especially women, caregivers, and health professionals. We've got a 3 Day Rest Adventure to share with you - it's free so no excuses! It’s only been 3 years since I started my own rest adventure using the rest tool of Yoga Nidra. I found it when I was completely worn out from helping my dad through his 3rd cancer surgery in a year while he lived 6 hours away from me. A podcast during my last commute before I moved him back to my area caught my attention and that led me on a 40 day Yoga Nidra challenge. One nidra nap and I was hooked. I'll never forget the way it refreshed and energized my worn-out body (and soul). I've stuck with it almost daily since then and when I find something that is this powerful for my mind and body I always want to share it with everyone which leads me to taking another certification (i.e. Pilates, Fascial Stretching, Trigger Point Therapy). Ironically, I found myself doing my Yoga Nidra Daring To Rest™ facilitator training during the first few months of the pandemic. I was rapidly approaching burnout due to having to coordinate care of my complex neuro patients (and my dad) in an upside down medical system while we all were dealing with the stressors of living through a global pandemic. Having Yoga Nidra in my rest toolbox kept me from crashing into my typical burnout cycle. I saw the signs and added as much nidra rest when I needed it as best I could to get me through it. What I love about Yoga Nidra is that it addresses 3 layers of exhaustion- physical, mental/emotional, and soul exhaustion. Most rest tools address physical or only one area but the deep rest of Yoga Nidra using the Daring To Rest™ method addresses all three. The best part is you don’t have to do anything except lie down and listen to a recorded meditation. You’ll get the rest medicine you need at the time. For me, the pandemic brought on intense mental/emotional exhaustion I had only felt on that level a few times in my life- after a divorce and the death of my mom. Lots of brain fog. I couldn’t even focus on reading books which I love to do. I definitely didn’t have any creative juices flowing until about the middle of 2021. As much as I’ve wanted to share what I’d learned in my training with our community, I had to listen to my body. The message until recently was "not yet Mollie, just rest." Honestly before I knew about this rest tool, I wouldn’t have listened. I would have pushed through to get it out there as I know how much it helps and is needed. Even though the message I’m getting now is “let’s go” and the brain fog has lifted, the plan is to ease our way into sharing this new rest tool with you. I’m inviting you on a 3 Day Yoga Nidra Rest Adventure. It’s free and only takes 15 minutes each day. All you have to do is lie down and listen to a recorded Yoga Nidra meditation at a time that works best for you. You’ll want to commit to the 3 days in a row to get the most benefit. JOIN US ON A 3 DAY REST ADVENTURE 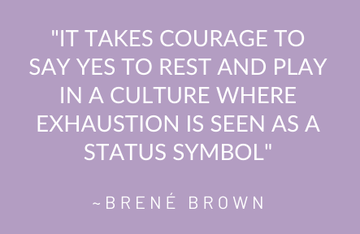 PREP WORK: MAKE SPACE FOR REST Your homework is to tune into your body and figure out what time of day you want to block off to rest for 15 minutes for your 3 day adventure. This will help you actually do it. It can be in the morning, midday when you have low energy, at the end of your workday before you transition to your evening home activities, or just before bed to help with sleep. The time doesn’t really matter. What matters is you commit to 15 minutes of rest for the 3 days by picking a time and blocking it off on your calendar as soon as possible. You can then schedule other activities around it. Trust that your mind and body will get what it needs no matter the time you pick. It’s OK if you aren’t normally a napper. This is deep rest and relaxation for your nervous system. You might just have the most nourishing nap you've ever had. Be open to testing it out. You have to feel it in your body to truly understand the benefits. It’s also OK if you're resisting because you’re telling yourself that you’re too busy. It’s normal for there to be resistance when trying something new and rest is not something that is encouraged by our society. Let the resistance pop up, notice it, but do it anyway. You deserve to rest no matter what your brain is telling you. SIGN UP NOW FOR 3 DAYS OF REST Say Yes To Rest! Mollie P.S. If you’re worn out, burned out or just in need of a time out, the free 3 Day Rest Adventure is for you. All you have to do is lie down and listen for 15 minutes. And we’ll give you 2 simple prep steps to help you actually slow down enough to do it. We’ve got you so… COME REST WITH US!
How's your stretching going?
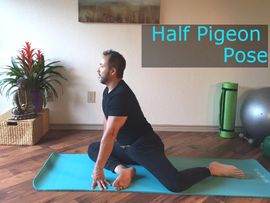
Did you practice calming your body with gentle stretching vs overstretching like we went over in the last Fit Blog? Hope so because it's time to kick your stretch skills up a notch with the 3-IN-1 Hip Stretch! It's an active recovery stretch for cyclists and spin lovers that takes less than 2 minutes. TBH we’ve held back on sharing this one for a while. We really need you to listen to your body so you don’t injure your knee doing it. Ease into this one especially if you have tight hips, IT Band or knee issues. Before you try these moves, please read through everything below so you get the most out of it and stay safe.
THE 3 STRETCH MOVES:
This 3-IN-1 Hip Stretch sequence is primarily a hip flexor stretch (unlocks the front of the hip) that moves into the fascia above (in your core muscles) and below (in your quad muscles) to work the front fascial line. For each stretch move, breathe and pull your belly up and in. Pace yourself and pause the video if you need more time to focus on your form. Listen to the cues in the video but the overall sequence and flow is:
HOW TO INTENSIFY:
HOW TO MODIFY the Quad Stretch (video at 0:47 and 1:50):
Change the position entirely if needed for the quad stretch so it’s less intense and less fascia stretching at the same time:
OVER TO YOU: The 3-IN-1 Hip Stretch helps open up the front of your hips for better posture and less tension on your back and knees. Once you get these 3 moves down, you can do the flow in less than 2 minutes for active recovery after riding or workouts to release the front of your hips, core and quad’s. You may notice one foot is harder to reach due to hip tightness and that one side is harder to balance due to hip weakness. That's normal but you can balance out and improve overtime with practice. There are a lot of ways you can progress yourself with the 3-IN-1 Hip Stretch as you bring the spring back to your tissue especially if you sit a lot for work or exercise. Enjoy! Team Core Power P.S. Want more stretch moves & massage tools to release your tight & tender hip & core spots? Join us in HIP Camp™. I'm sure you've heard about how to exercise your core muscles in your trunk area but did you know you’ve got a foot core too? We’ve got 4 layers of muscles in feet- i.e. the intrinsic muscles. 4 layers!!! Doesn’t seem like there is enough room, does it? Most of the time you only hear about the plantar fascia (connective tissue) as it gets all the attention when it’s flared up, i.e. plantar fasciitis. They may not be as vocal when you’ve got a foot injury, but the foot intrinsic muscles are important too. They make up your foot core and help provide stability of the arch and control toe movements. They play a huge role in functional movements and by helping with your balance and posture. It's very easy for them to be weak or even turned off due to tight spots in your calf and foot fascia. They LOVE to be lazy when you’re wearing cushy shoes (all that cushion in our shoes helps with impact on our joints but encourages our foot core to not work very hard). So how about we give them some love in honor of Valentine’s day? 1. DO A FOOT CORE CHECKUP. You probably know if you have a high arch, low arch or no arch but let’s see how your foot core muscles are doing. This might be easiest to do in front of a mirror where you can see your foot vs trying to look down at your foot. Or you could video and look at it after you do the moves. Stand on one leg. Hold onto a counter, wall or chair if needed to but with as little support as possible. Don’t lock out your knee- keep a soft knee. What do you see going on in the foot your standing on? Is there any flickering going on in the top of your foot tendons or any movement side to side from trying to keep from falling over? Or is your foot like a flat pancake on the floor with no arch? Or maybe it’s like a dead fish- limp, no life? Are your toes holding on for dear life to the floor, so you don’t fall over? How does it feel? Does it hurt to stand on one foot? Are you wondering where the floor is? Is it hard to balance? Are your hips working hard moving side to side to keep you upright? No judgment just look and feel what’s going on or not going on. What happens if you bend your knee slightly? Any changes? Now check out the other foot. Go through same questions and then compare to other foot. Flat arches, no signs of muscle activity on top of your foot, difficulty balancing and/or your toes flexed and trying to grip on the floor are signs your foot core muscles need some attention. One foot core may be having more issues than the other one. It'll depend on which hand you are dominant and what kind of activities you do each day. Also if you've had any injuries on one side. It doesn't matter, both sides probably need attention. 2. GIVE YOUR FOOT CORE SOME LOVE. Massage your foot core: Self-Massage on the bottom of your feet with your hands or massage tools will help release trigger points (tender spots). Keep it simple and use a tennis ball, racket ball or even dog toy if you don’t want to buy a massage tool. Roll back and forth from the ball of your foot to the heel or find tender spots to hold pressure on for a few breaths then move to another tender spot. You can do foot massage in sitting or standing. Sitting is less intense than standing. Massage the bottom of your foot as described to get to the foot core muscles. You can gently massage the top of your foot with your hands but the top (dorsum) of your foot is more sensitive and more bony. If your foot is flared up, you can do ice massage by rolling back and forth on the bottom of your with a frozen water bottle for several minutes. An added bonus to massaging your feet is that the bottom of your foot has acupressure spots for every organ in your body. When you massage your foot, you’re sending calming signals to your whole body. Stretch your foot core: Stretching the tight spots in your toes, ankles, and calves in sitting or standing can help your foot core turn on.
Strengthen your foot core: Full body and barefoot workouts like Yoga or Pilates will help strengthen your foot core.
Challenge your foot core: Pilates Reformer work, unstable surfaces (like Bosu ball or foam surfaces) and doing band work resistance exercises barefoot are some of my favorite ways to challenge the foot core. Support your foot core: Good arch support will help keep your foot in good alignment which helps your foot core turn on properly. You might need some extra arch support if you have very flat feet or high arches, stand a lot each day, or do an impact sport like running. It could be a simple over the counter foam insert to a custom orthotic. Typically, the liner that comes in your shoe is crap. You’re not looking for a huge build up under the arch. Just a little arch support so it’s not completely collapsed, and you aren’t getting pain in your feet or knees with activities. You can learn from a health professional how to use kinesiotape to calm down foot pain if you get flare ups and support your arch but it’s important to also strengthen your foot core to help avoid foot injuries. 3. DO A RECHECK. If you try any of the above foot care tips, recheck to see how your foot core is doing. Stand again on one leg and see what’s going on down there. Do you see more activity on the top of your foot, have better balance and/or a little bit of arch activity where there is some space between your foot and the floor? How does it feel? Hopefully you’ll feel more contact with the floor and more grounded or stable overall. Even though your feet are at the end of the line, they’re the first body part in contact with the ground which then causes a chain reaction up the leg and into your trunk muscles. They need just as much love as the rest of your body. Just a few mini moves for the foot core make a big difference in your posture and balance. Give your foot core some love each day! Mollie P.S. Want more tips on how to check your form? Here's a Fit Blog that'll help. Want more massage tools & stretch routines to support and challenge your foot core (and hip core) We’ll show you how in HIP Camp™. It’s time to move it. Move your body. Let’s face it, there’s still a ton of chaos going on in our lives. One way to release all that energy you can’t help but absorb is to move your body. Sometimes we need to move our body to get an energy boost, but the prescription we need right now is to move our body in ways that release energy. Here are 4 MOVES to release all the anxious energy you’ve got trapped in your body. They will all help you feel more calm, centered, and confident.
Summary: Pick one move or try them all. You may have days when you need to throw everything at it to get back in your body (i.e. more centered and calm) so you can carry on. All is Well! Mollie What's on the agenda for you over the long, holiday weekend? Hopefully something to refresh your mind, body and soul. I don't know anyone that isn't needing more rest in their life right now. All forms of exhaustion- mental, physical, emotional- are at an all time high. So here is your Rest Prescription for the weekend. It's a great one to help you fall asleep but you can also do it floating in the pool and before taking a nap in a hammock. It's super simple.
If you get off track, start over at 32 or just pick any number and count backwards as you do a full inhale and exhale. You can pick any number. It doesn't matter where you start. If you fall asleep, woohoo. Just rest. When you wake up, you wake up. Whatever length of time it is, your mind, body and soul needed it. Get outside if you can over the weekend and do a few minutes of this breath work to take a nap. Use the exercise to help with sleep on a regular basis. Deep breaths and baby steps! Mollie P.S. Want better sleep? Download this 5 minute rest meditation to take a quick time out, prep for a nap or to relax your body before sleep. Before you jump into your core workouts, try these moves to help turn on your core and maximize your results. OPEN UP YOUR HIPS: tight hips can make it harder to contract the pelvic floor muscles (the base of your core). In fact, tight hips can pretty much turn off your pelvic floor. Stretch the front and back of your hips with a runner’s lunge and full squat to prep for a core workout. WARM UP YOUR SPINE: The Baby Get Up is one of our favorites for warming up your spine and turning on your core before a workout. CHECK YOUR FORM: Use this Head To Toe Posture Checklist to turn on your deep core stabilizer muscles and reset your posture during workouts. Be mindful of these spots for better form and check in frequently from head to toe that you’ve got yourself lined up during your core workouts. Here is the Head To Toe Posture Checklist and posture cues to become familiar with and the video to walk you through the following spots.
HEAD TO TOE POSTURE CHECKLIST VIDEO Becoming mindful of these key spots from head to toe during your core, Pilates or Yoga workouts will help you improve your posture overtime. Using good form during your workouts WILL carry over into your day. You can take these posture cues out of the gym or off the mat to help reset your posture anytime during your day. Better posture equals more confidence, better performance, and decreased risk for injury. You’ll walk, run, bike, row, and move better. Prep, Reset, Reshape! Mollie P.S. Download the Head To Toe Posture Checklist Video to reset your posture during your day. Exciting news! Mini Massage Camp™ is ready to roll. You'll find details below. But first, let's talk about pain down there. This is Part 3 of the Pelvic Floor Series to help you have a strong, healthy pelvic floor for better core workouts, posture and performance. We've addressed how to do a proper Kegel exercise (part 1) and how to trouble shoot the more common mistakes of the Kegel (part 2). Now let's talk about what you can do to address pain or injuries to the pelvic floor muscles. Pain anywhere in your body can turn off the muscle that is inflamed or hurting. Your pelvic floor muscles can be injured just like any muscle resulting in painful scars and trigger points, weakness, or soft tissue restrictions. Damage to these muscles can occur due to:
Injuries to the pelvic floor muscles can lead to pain or decreased sensation with sex, incontinence (leaking of urine or bowel), or organ prolapse (bladder, uterus or rectum drops lower). Fortunately there are treatment options to help rehab the pelvic floor after injury:
All of these rehab techniques can be done externally (in the pelvic, lower abdominal and back region) or internally (through the vagina or anus). Let’s break this down more. External Pelvic Floor Rehab addresses pain from an outside approach. A Physical Therapist, especially one experienced with manual therapy and Pilates Rehab, will have the skills to provide exercise and treatment to stretch, strengthen, and release adhesions in the muscles around the hips, pelvis, and core. Pilates Rehab with pelvic floor retraining is how I healed from a back injury that almost caused me to retire from PT in my 20's. I still use the exercises along with fascial bodywork tools to help my pelvic floor and core stay healthy and pain-free. These are the techniques I have taught my clients for years, many who had pelvic floor dysfunction or back pain, and now teach in my online camps. Internal Pelvic Floor Rehab addresses pain from an inside approach. These specialists are certified to work internally on the pelvic floor muscles to stretch, strengthen and relax muscles in the lower pelvis. They're usually Physical Therapists or Nurse Practitioners with advanced training in this area. They can do manual therapy internally to release restrictions, biofeedback training to help strengthen, guide vaginal weight training for prolapse (i.e. vaginal pessary training), and design an exercise program to address your specific needs. If you've had an injury to your pelvic floor muscles that has resulted in pain, scarring or incontinence (leaking of urine or bowel), reach out to your OB/GYN, Urologist, or Midwife for a referral to a Pelvic Floor Specialist in your area. Internal pelvic floor rehab is a treatment to consider for decreased sensation or pain during sex as well. If you experience painful orgasms (dysorgasmia), this Mind Body Green article has 17 treatment and tips that you might find helpful. If these more conservative approaches listed here don't help, there are medications and surgical options available. In addition, acupuncture or lifestyle changes for weight loss may be beneficial. These issues can be debilitating but are treatable. Don’t give up. Keep searching for someone to help you with your issue. It's never too late! Mollie P.S. Ready to have more freedom & flow in less than 10 minutes a day? You’ll want to check out Mini Massage Camp™! Learn more. It's time for more Kegel talk. A simple movement that can turn complicated quickly. In Part 2 of this series, we’ll be troubleshooting some of the more common Kegel mistakes to help you have a strong, healthy pelvic floor for better core workouts, posture, and performance. Quick review: One of the most neglected areas of the body and least talked about until you’ve got an issue down there, is how to have a healthy pelvic floor (PF). The pelvic floor muscles are important for all ages but can need more attention as you age. They form the base of your core and support all your organs. The Kegel exercise is the basic way to strengthen them. We reviewed how to do a proper Kegel in this blog post. Here’s the challenge of the Kegel... A proper Kegel is done when you can contract the PF without the rest of your body tensing up. Easier said than done, especially when you start moving your body while you Kegel. Let’s do some troubleshooting on how to avoid the more common mistakes when you Kegel. Do a check in while you Kegel. Are you?
Here are some tips to prep for the Kegel and take the tension out of your body:
 OTHER AREAS TO ADDRESS FOR A HEALTHY PELVIC FLOOR A few other issues you’ll want to pay attention to as you improve the overall health of your Pelvic Floor Muscles: Pelvic Floor & Constipation Constipation and doing the Valsalva maneuver (holding breath and bearing down when lifting or pooping) can over stretch the PF muscles. Improving the health of your gut can take pressure off your PF muscles that have the job of holding up your organs. Do you have any GI issues? 1 in 4 Americans do. You could have up to 15 # of mucus from inflammation in your gut. Signs are painful joints, bulging belly, bloating. All that puts load on your PF muscles. You can decrease inflammation through clean eating with lots of green veggies, eliminating foods that irritate (dairy, refined sugar, gluten), staying well hydrated, doing a quarterly detox/cleanse, taking probiotics and exercising regularly. You might also want to check out The Squatty Potty™, a toilet stool that puts your body in the best posture for pooping to take pressure off your PF. Pelvic Floor & Hormones If you identify as female and still bleed monthly, you might notice that it’s easier to do Kegels during the middle of your cycle and more difficult at the beginning of it due to hormone changes. Just keep at it but be mindful of your cycle and plan your more intense workouts toward the middle of it when your pelvic floor muscles might be at their best. Pelvic Floor & Fatigue The pelvic floor muscles can fluctuate in endurance just like any muscle. Sometimes you can turn them on but not keep them on because of fatigue. Or you may notice you can turn them on with bladder empty but not with weight of full bladder (or when constipated). The weight of your organs may challenge the PF when tired. That’s OK – you just need to build your strength and endurance like you would any other muscle. For strengthening, use the weight of gravity to challenge your PF. Example: going from laying down to sitting to standing to moving your body as you Kegel. Each position has to deal with more and more gravity. For endurance, add reps throughout the day to challenge your PF. Once you can do a proper Kegel in sitting, you can practice anytime throughout the day to build endurance- while driving, watching TV, standing in line. The more complicated the activity you are doing, the more challenging it will be to hold the Kegel and breathe. The more mindful you can be of your form while holding your Kegel, will help guide you on when to challenge yourself with more gravity or moving your body. When you can’t hold the Kegel without tensing up in a position, you may have pushed too fast or done too many reps in that position. Listen to your body. It’ll guide you. You'll know when you need a rest break or it's time to slow down. You've got this! Mollie
Got tight hips? No problem, we've got 3 moves to help you not only open up your hips where we trap a lot of our emotions (especially women or those who identify as female) but challenge your stability and balance: The Warrior Moves Daily Hip Routine.
How to Modify: modify the routine by holding onto a counter, wall or chair.
How to Intensify: make the routine more challenging by holding the positions longer than in the video or by going through the routine more than once. To Healthy Hips! Mollie P.S. Ready to have a calm, strong, well-rested body? Our online bodywork camps will not only help you Move With Ease but every camp sale supports an organization that improves the health & welfare of animals and wild life like the Beagle Freedom Project & Sheldrick Wildlife Trust. Learn more. |
Mollie, Ender, Ty & Teddie
Mollie Miller, PT
|
 RSS Feed